To create a course offering, navigate to Course >
Course configuration, and then complete the configurations in the
following sections.
General information
Complete the following configurations to fill in the general
information of the course:
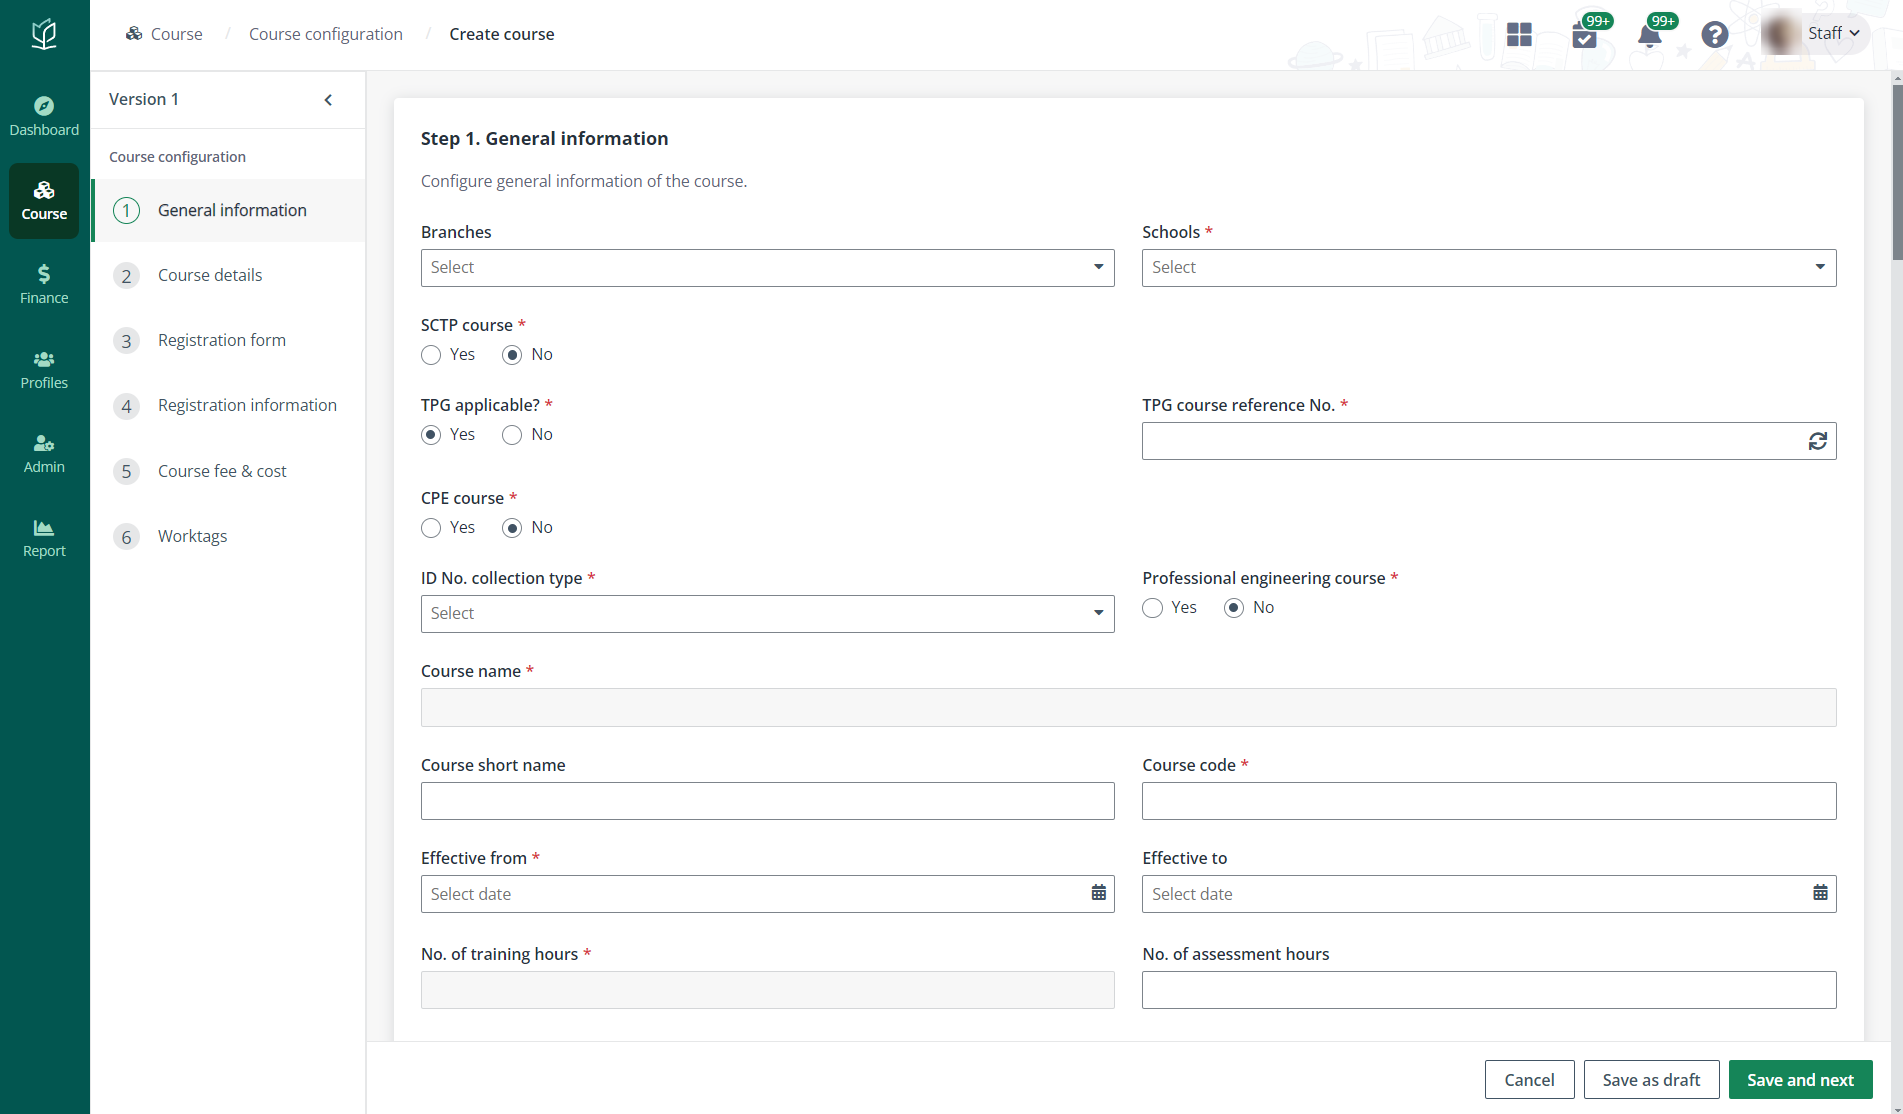
1. On the Course
configuration page, click Create and starts from Step 1 –
General information.
2. Fill in the
general information of the course.
•
If the course is TPG applicable, enter the TPG course reference
No. and click the Sync button to retrieve information from TPG.
•
If the course is a CPE course, select a learner contract template
for the course. This requires the Enterprise Pro subscription. With this
subscription, Admin’s organisation can contact MaivenPoint support to request to
enable the functionality.
3. For a TPG
applicable course, the SSG-related information is also retrieved. In the
SSG-related information section, admin can view the retrieved information
and configure the editable fields.
4. In the Owner
assignment section, add one or more course owners. Admin can enter usernames
in the text box or select users from the address book.
5. When the
organisation has customised tags, enter tag values in the Customised
fields section.
6. Click Save and
next and proceed to configure Step 2. Course
details.
Course details
In Step 2. Course details, complete the following
steps:
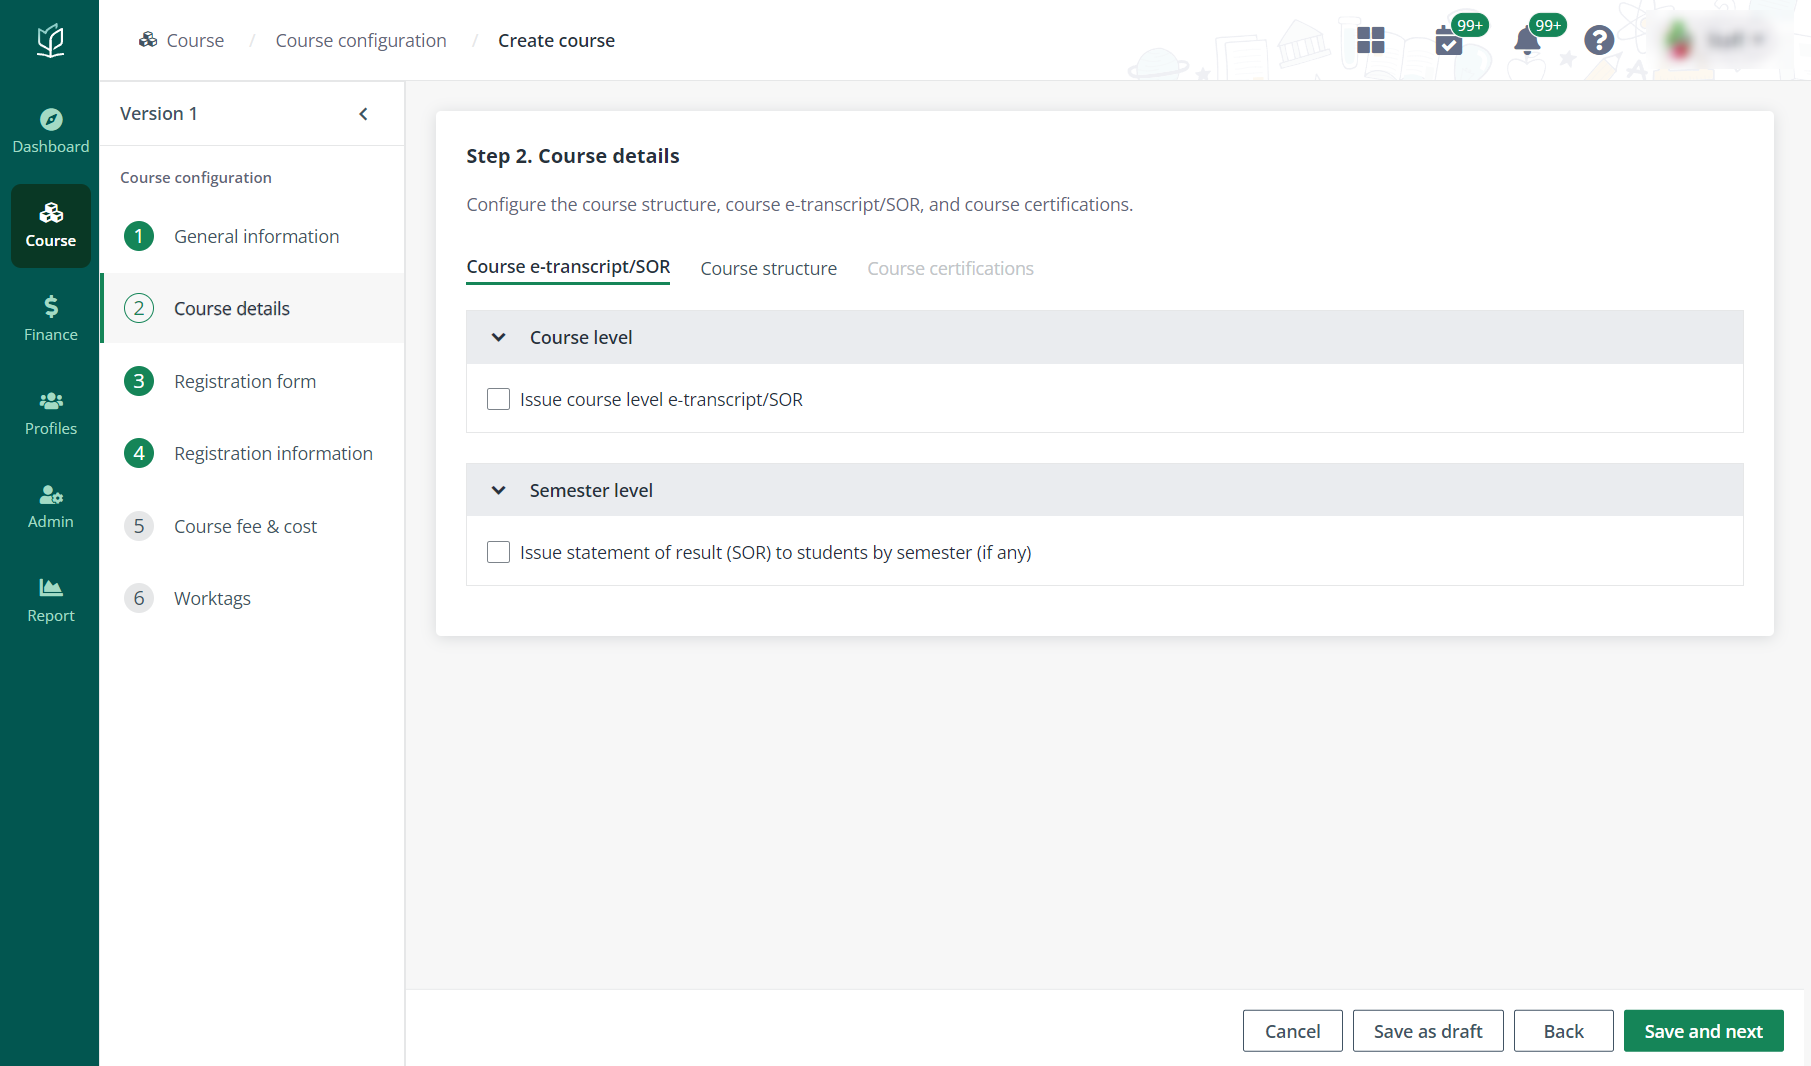
1.
In the Course e-transcript/SOR tab, choose to issue the course
e-transcript/statement of result (SOR) to learners by course level, semester
level, or both levels.
•
Course level – The e-transcript or SOR will be issued to learners
after the course completes. Select the Issue course level
e-transcript/SOR checkbox, select the type of document to issue, and then
select a SOR or e-transcript template.
•
Semester level – The SOR will be issued to learners at the end of
each semester. Select the Issue statement of result (SOR) to learners by the
semester (if any) checkbox, select the type of result to include, and then
select a SOR template.
2.
Click Save and next.
3.
In the Course structure tab, add normal course pathways for the
course.
4. Click Add
normal course pathway.
5. Choose one type
of minimum requirement, By number of modules or By number of modular
credit units, and then enter a number as the requirement.
6. Click Add
module, add modules in the panel, and then choose the module type for each
module.
7.
Click Save and next. The Confirm the course structure window
appears asking for the confirmation. Click OK to confirm.
8.
In the Course certifications tab, admin can see all previously configured
pathways. Click Add certification, fill in the information of the
certification, and then click Save to add the certificate to the specific
pathways.
*Note: When adding a modular certificate or post
diploma certificate, admin can choose whether the certificate is TPG applicable.
If TPG applicable is enabled, enter the TPG course reference number.
9.
Click Save and next and proceed to configure Step 3. Registration
form.
Registration form
In Step 3. Registration form, configure the
registration form of the course with the following steps:
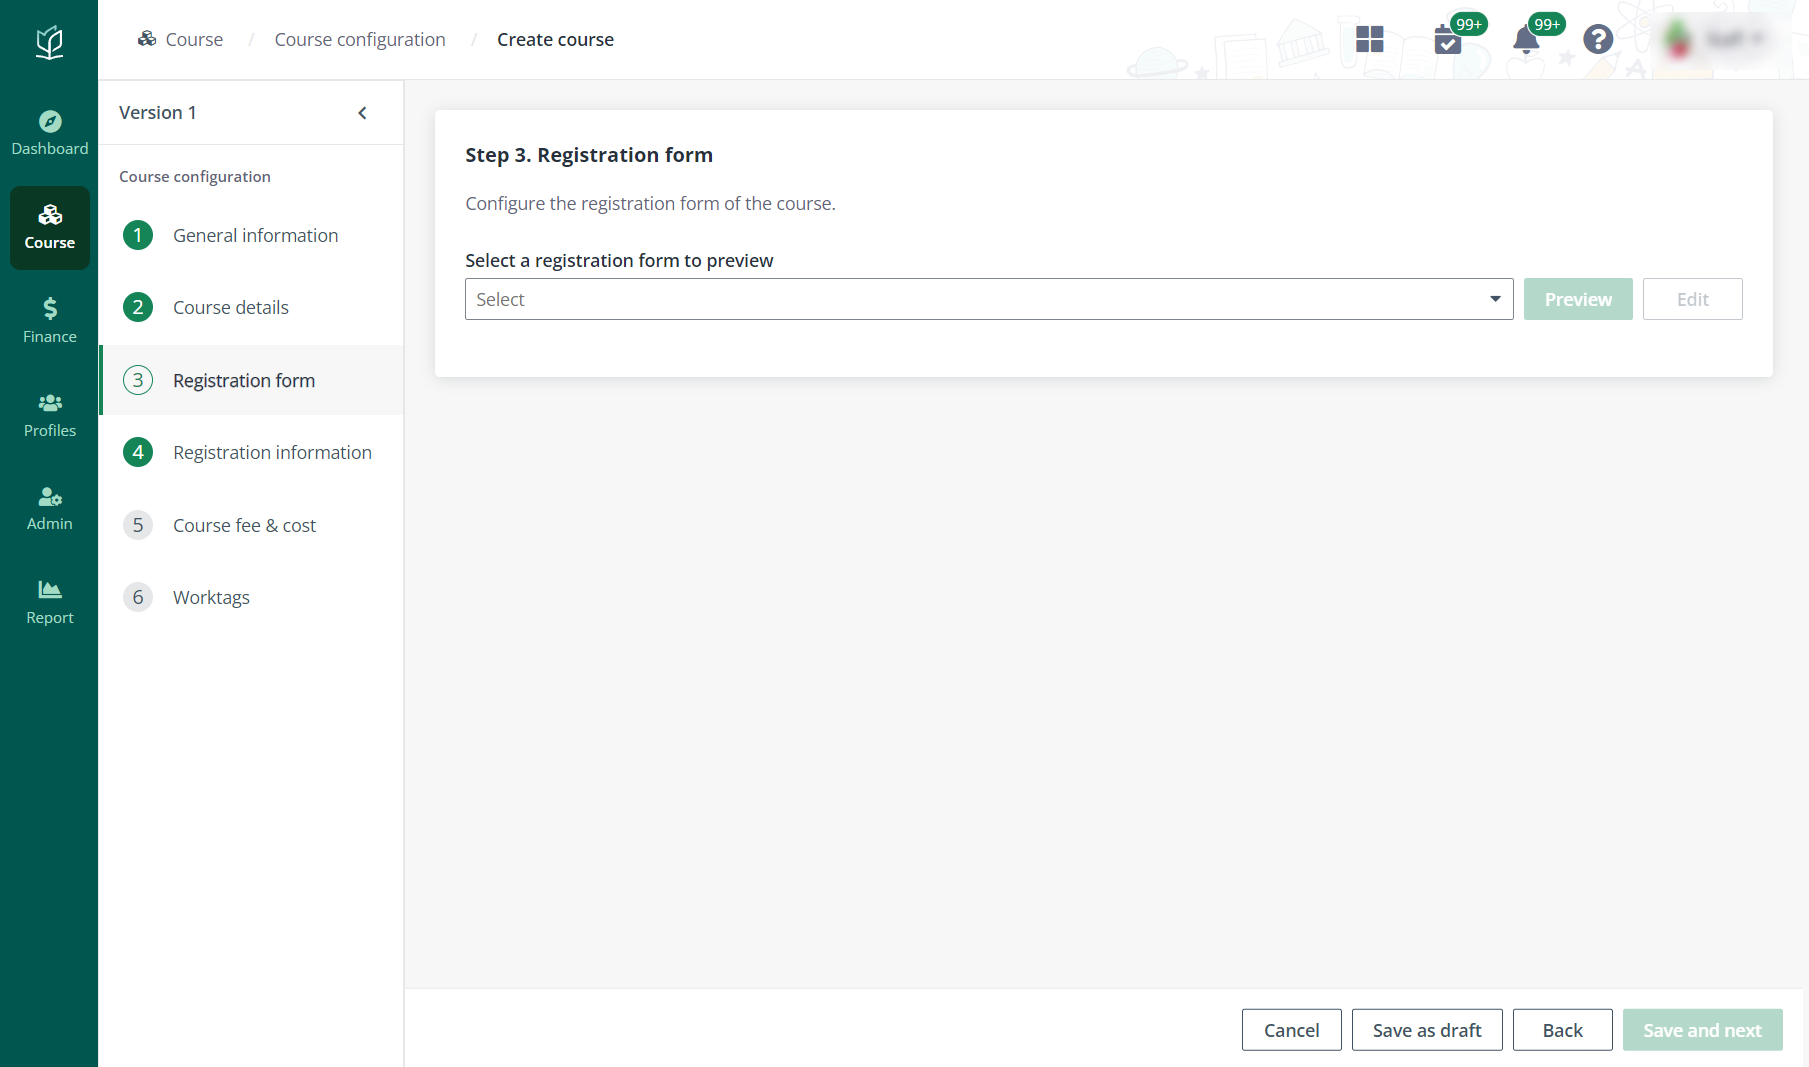
1. Select a
registration form, and then click Preview to preview the form
details.
2. To update the
registration form, click Edit.
3. The registration
form provides three built-in sections available for course application:
Education qualifications, Working experience, and Colour
blindness test. Configure the following settings of the built-in
sections:
•
Visible to applicants – Turn on the toggle to make the
section visible to applicants.
•
Supporting documents – Enter the description for supporting
documents and choose whether to require learners to upload supporting
documents.
4. Admin can add
customised sections by completing the following steps:
a. Click Add section.
b. Enter the section name and click the
Save button.
c. Click Add field and
configure the field settings. Refer to the different field types below:
o Single line of the text
and Multiple lines of text
§ Mandatory – Choose whether to
define the field as the mandatory field.
§ Maximum number of characters –
Configure the maximum number of characters that can be allowed to enter.
§ Field name – Enter the name of
the field.
§ Description – Enter a description
for the field.
o Choice
§ Mandatory – Choose whether to
define the field as the mandatory field.
§ Display style – Select a display
style of the choices.
§ Field name – Enter the name of
the field.
§ Description – Enter a description
for the field.
§ Add choice – Click Add
choice and enter a value for each choice.
o Date and time
§ Mandatory – Choose whether to
define the field as the mandatory field.
§ Date and time format – Select a
format of the date and time.
§ Field name – Enter the name of
the field.
§ Description – Enter a description
for the field.
o File upload
§ Mandatory – Choose whether to
define the field as the mandatory field.
§ Field name – Enter the name of
the field.
§ Description – Enter a description
for the field.
§ Template – You can upload a
template file from your local device.
o Table
§ Mandatory – Choose whether to
define the field as the mandatory field.
§ Field name – Enter the name of
the field.
§ Description – Enter a description
for the field.
§ Add column – Click Add
column. Enter the column name, select a column type, and then enter the
value for each column.
5.
Click Save and next and proceed to configure Step 4 Registration
information.
Registration information
In Step 4. Registration information, configure the
following settings:
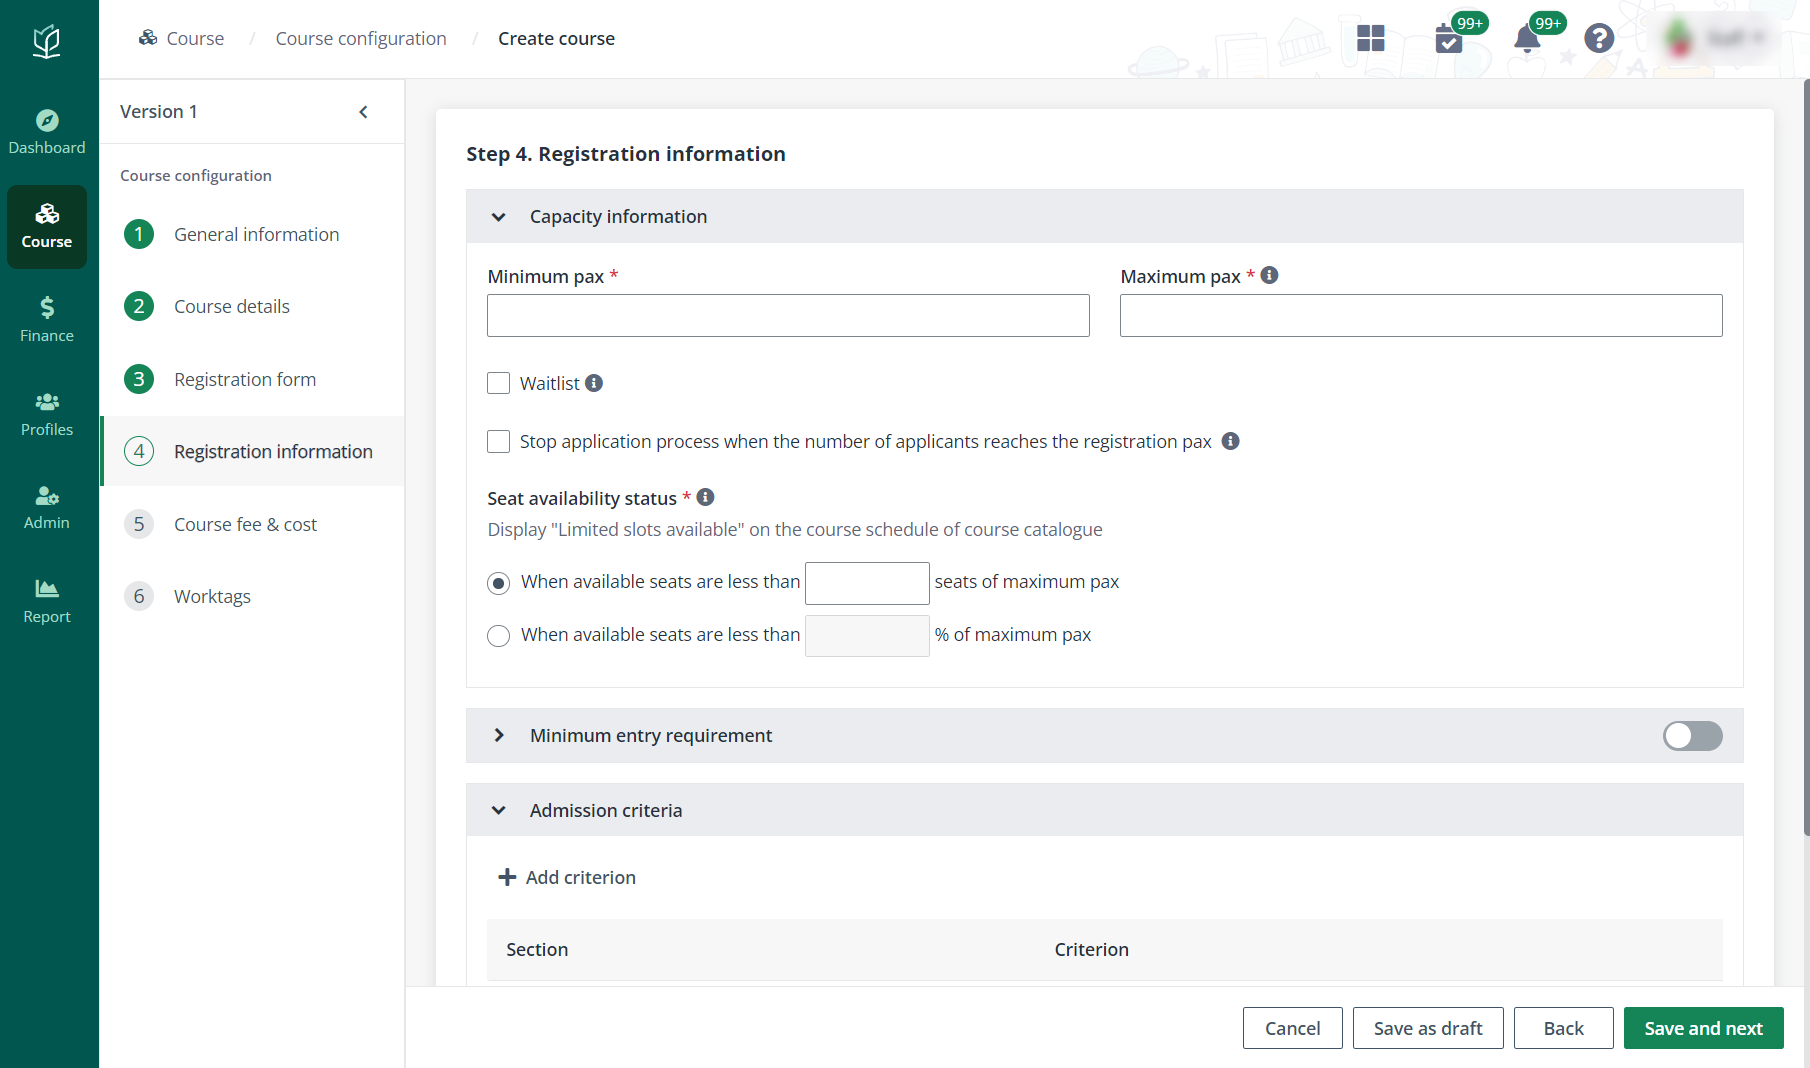
•
Capacity information
o Minimum pax – Enter the
minimum pax of each course intake.
o Maximum pax – Enter the
maximum pax of each course intake.
o Waitlist – Choose
whether to enable the waitlist for additional registration pax. If selected,
enter the number. Admin can also choose whether to enable the Automatic
waitlist handling. If enabled, all waitlist applications will be rejected
one day before the course start date.
o Stop application process
when the number of applicants reaches the registration pax – If enabled, the
course intake status will be “Application closed” when the number of applicants
reaches the registration pax.
o Seat available status –
Configure when to display "Limited slots available " on the course schedule of
the course catalogue.
•
Minimum entry requirement – When the course has the minimum entry
requirement, the conditions are displayed for reference.
•
Admission criteria – Admin can add additional admission
criteria.
o Add criterion – Click
Add criterion, select a section, and then enter the value for the
criterion. Admin can add multiple criteria.
o Evaluation criteria
description – Enter a description for the evaluation criteria.
Click Save and next and proceed to configure Step
5. Course fee & cost.
Course fee and cost
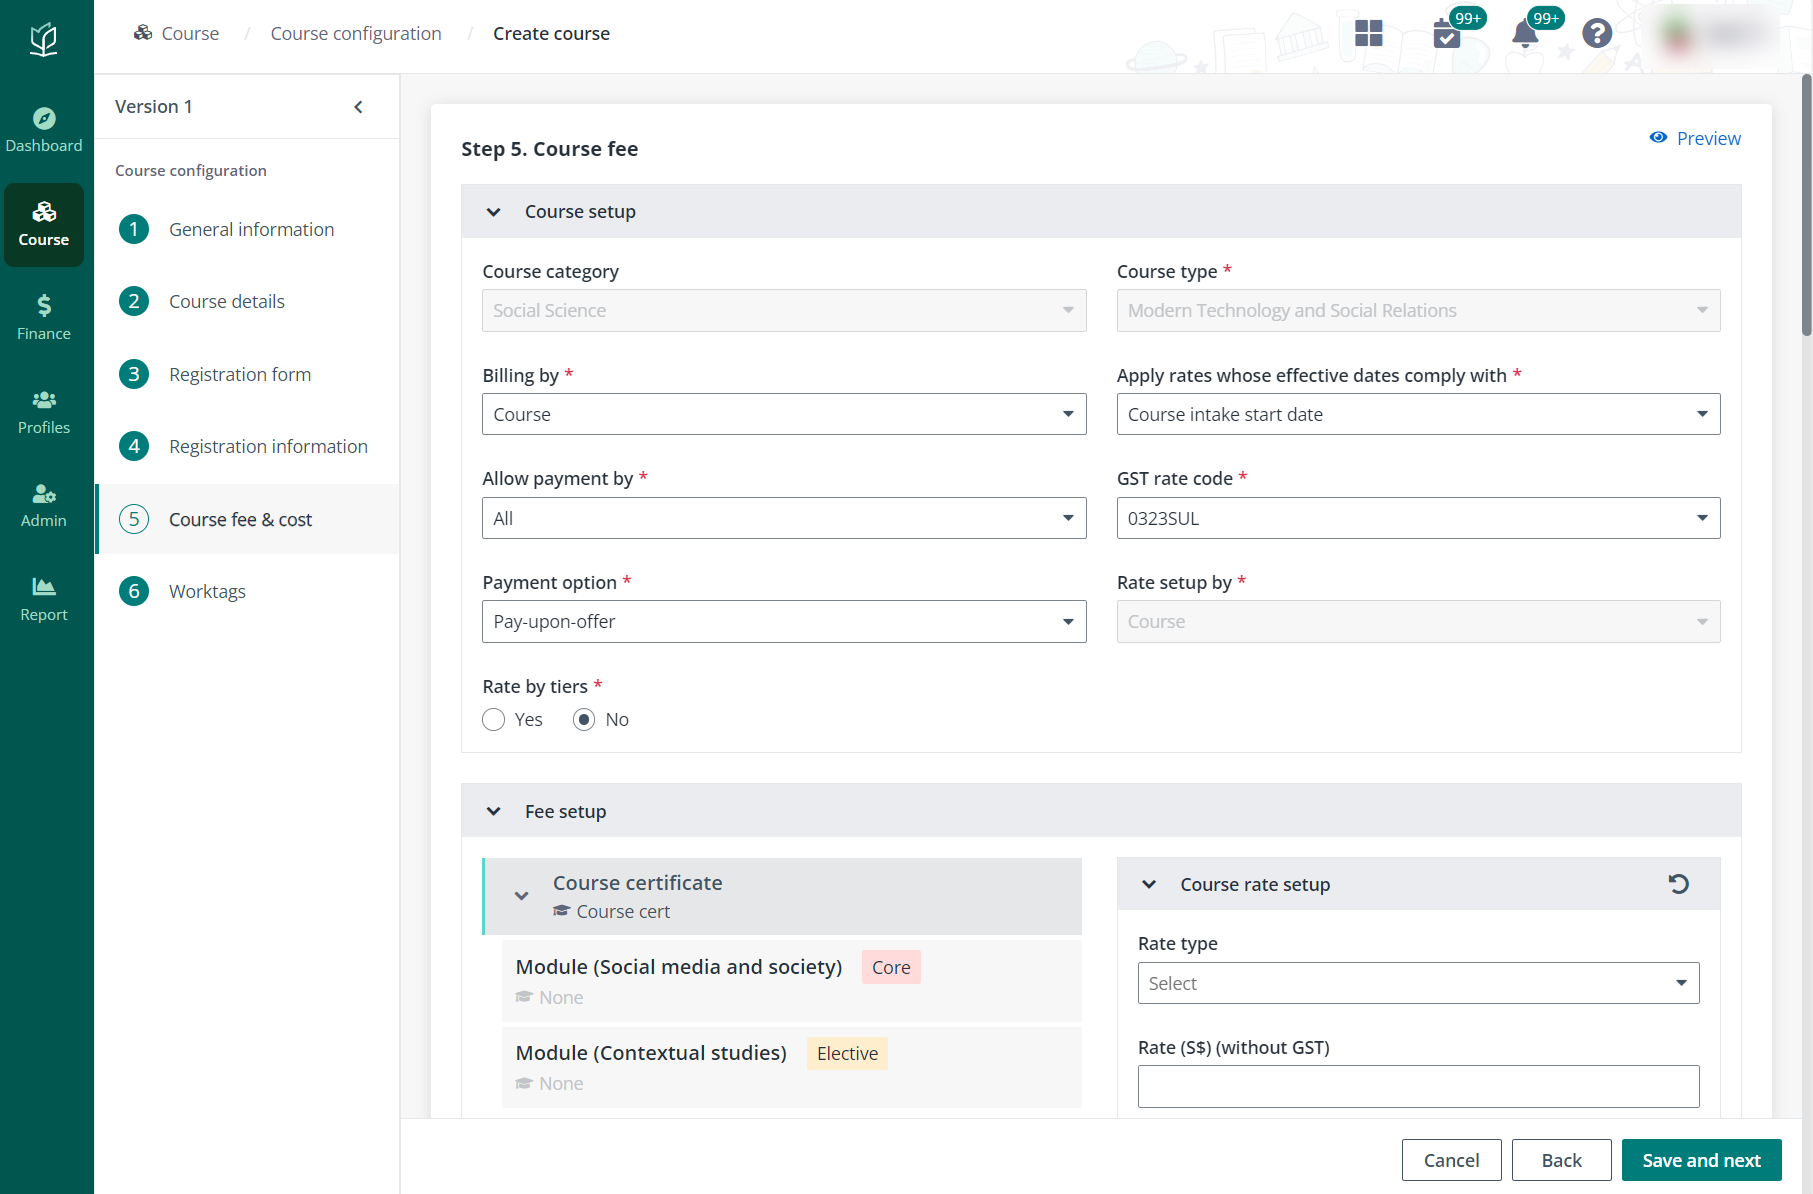
In the Course setup & cost section, admins need to
complete the course setup by configuring the billing basis, available payment
modes, GST rate code, payment options, and whether to rate the course by tiers
of pax numbers.
Note the following:
•
Cost configuration requires the Enterprise Pro subscription. With
this subscription, your organisation can contact MaivenPoint support to request
to enable the functionality.
•
For the Apply rates whose effective dates comply with
field, select a type of date. The rates whose effective dates comply with the
selected date will be available for the course.
After the course setup is finished, complete the fee setups
following the steps below:
1.
In the Fee setup section, the left pane displays the course structure and
the right pane displays the available configurations, including:
• Click
Course to view supplementary fees available for the course. To remove a
supplementary fee from the course fee, deselect the checkbox.
• Click
a post-diploma certificate to configure the fee for the PDC, including:
o Course rate setup – If
there is a course rate complies with the configured conditions in Course
setup. The rate will be the default rate applied to the course.
o If there are no available
course rates for the course or the course rate needs modification, select rate
type and enter the rate amount without GST. Click the Edit button to edit the
course rate for the PDC. If edited, the course rate for the module under this
PDC will have the same course rate. The rate of this course will be calculated
by this unified rate, instead of by separate module fees.
o Funding
§ Funding base – Select a basement
method of the course fundings.
§ Map SSG grant calculator’s baseline
funding to – When the course is a TPG course with SSG funding, select
whether to map the baseline funding to Subsidy (Cat B/C) or
Grant (Cat A).
§ To apply a funding to the course, select
the checkbox.
o Discounts – To apply a
discount to the course, select the checkbox.
• Click
a module to configure the fee for the module, including:
o Course rate setup –
Select rate type and enter the rate amount without GST. If course rate is set up
on the module level. The course rate of the PDC will be calculated based on the
course rate configured for its modules.
o Supplementary fees – To
add a supplementary fee, select the checkbox. The rate type and rate amount of
supplementary fees can be edited by clicking the Edit icon on the top right of
the Supplementary fee section.
2. Configure the
Rate setup if the course is rate by tiers.
•
Click Add tier to add tiers and define the course rates by
the ranges of pax number.
•
Select or deselect supplementary fees and discounts for the
course. The rate type and rate amount of supplementary fees can be edited by
clicking the Edit icon on the top right of the Supplementary fee
section.
3.
In the Registration fee section, select a registration fee.
4.
In the Additional cost rates section, click Add additional cost
rate to add the rates created in Master data.
5.
In the Supporting document section, upload supporting documents for the
fee setup.
6.
Click Complete to finish the course setup.
If the course is a CPE course, instalment and insurance fee
can also be configured. This requires the Enterprise Pro subscription. With this
subscription, your organisation can contact MaivenPoint support to request to
enable the functionality.
If the course is applicable to TPG, in the course fee setup,
admins can use the information of an applicant to check the grant and fees
payable for applicants in specific conditions. Follow the steps below:
1.
Click Grant calculator on the top.
2.
In the Grant calculator panel, complete the required configurations.
3.
Click Test. The amount of grant, subsidy, and course fees payable for the
applicant calculated by the SSG grant calculator and Vitae calculator will be
listed for reference.
Worktags
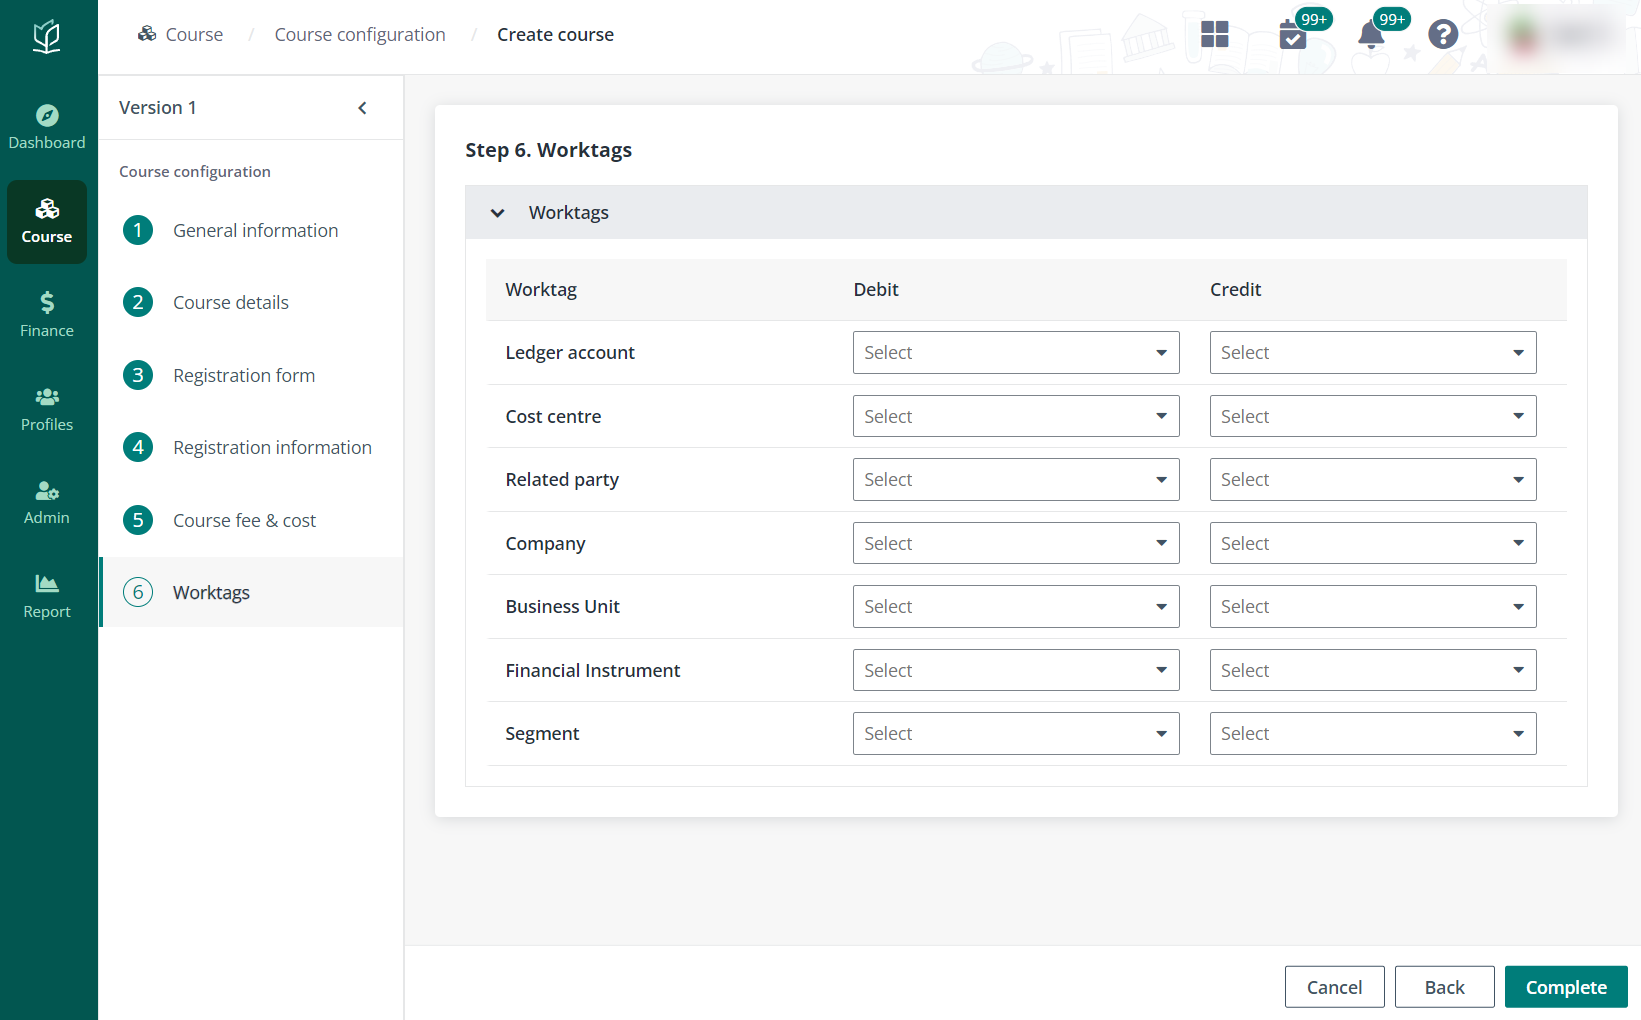
In the Worktags section, complete the worktag setups.
For more information on worktag management, refer to Manage
worktags.


