Examena
leverages papers and
questions to provide a
simple process of
creating an exam.
• A
paper is a group of questions that are prepared according to the course
syllabus. You can create a paper by selecting existing or creating new questions
on demand.
•
Multiple types of questions are provided in Examena. You can customize
questions with the provided question types, define the question difficulty
level, and configure the marking scheme for markers to know the right criteria
of answers.
You can set
up open-book exam or
closed-book exam via
MaivenPoint Examena.
• The
open-book exam allows access to the internet and other applications, and
candidates can use the Examena web portal to take the exam.
• The
closed-book exam applies with strict AI anti-cheating remote live proctoring and
screen lockdown, and candidates must take the exam via Examena app.
You can create an exam following the setup steps, or creating
exams in bulk by importing the exam information from a file. You can export the
information of some exams, and configure the information of new exams in the
file.
Now let’s see how Sena, the course manager of the Math 101
course, uses Examena to set up
a mid-term exam for the course.
She will need
to do the
following in order.
First,
set up the
exam basic information
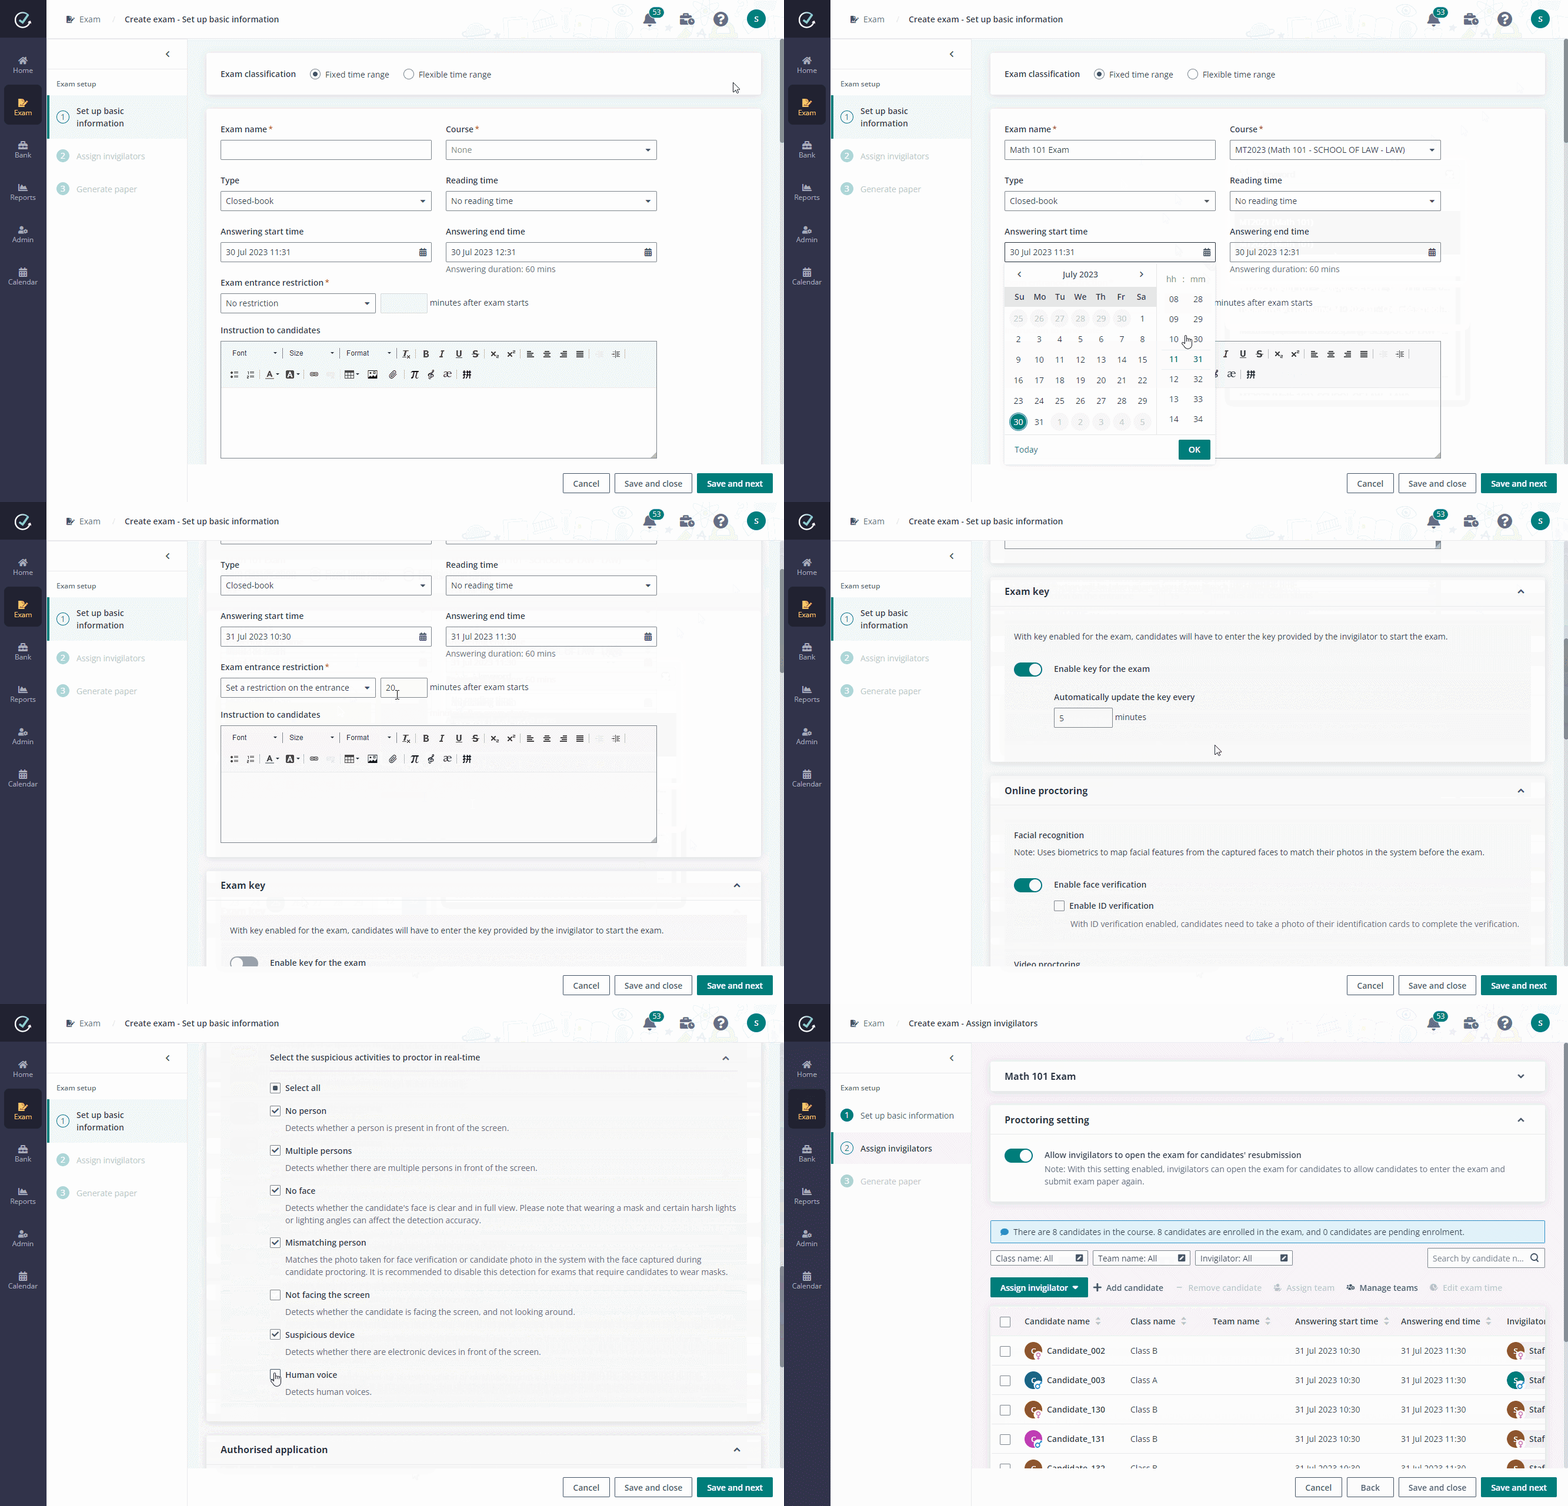
1. In Examena, she
clicks Create exam in the quick tutorial for Examena.
2. Select the
classification for the exam, Fixed time range or Flexible time
range.
3. Enter a name for
the exam and select the Math 101 course.
4. Select
Open-book or Closed-book from the Type list.
5. Configure the
following settings based on the exam classification:
Fixed time range:
a. Select whether to enable reading time
for the exam by selecting No reading time or Set reading time before
exam. With reading time enabled, you can select a reading start time and the
reading duration. The answering start time will be automatically adjusted based
on the reading start time and reading duration.
b. The exam end time will be
automatically adjusted as the default exam duration is 60 minutes. You can also
select an answering end time for the exam manually.
c. Select whether to set a
restriction on the entrance for candidates. If you select Set a restriction
on the entrance, you can further set the time restriction. Candidates are
not allowed to start the exam if they enter the exam later than the time
restriction.
Flexible time range:
a. Select an exam open time and exam
deadline from the calendar. After the exam is opened, candidates can start the
exam at any time before the exam deadline.
b. Select whether to enable reading time
for the exam by selecting No reading time or Set reading time before
exam. With reading time enabled, you can select a reading duration.
c. Set an answering duration for
the exam. The exam end time for the candidate is calculated based on the exam
started time of the candidate, the reading duration (if reading time is
enabled), and the answering duration. For an open-book exam, you can select
No answering duration to allow candidates to access the exam at any time
of the exam period.
d. For an open-book exam, you can set
the Allowed number of attempts. Then, candidates can attempt the exam
multiple times.
6. Enter the
instruction for candidates if needed.
7. For a closed-book
exam, you can choose whether to enable a key for the exam. With a key enabled,
candidate will have to enter the key provided by the invigilator to start the
exam. Then, you can define the interval to update the key.
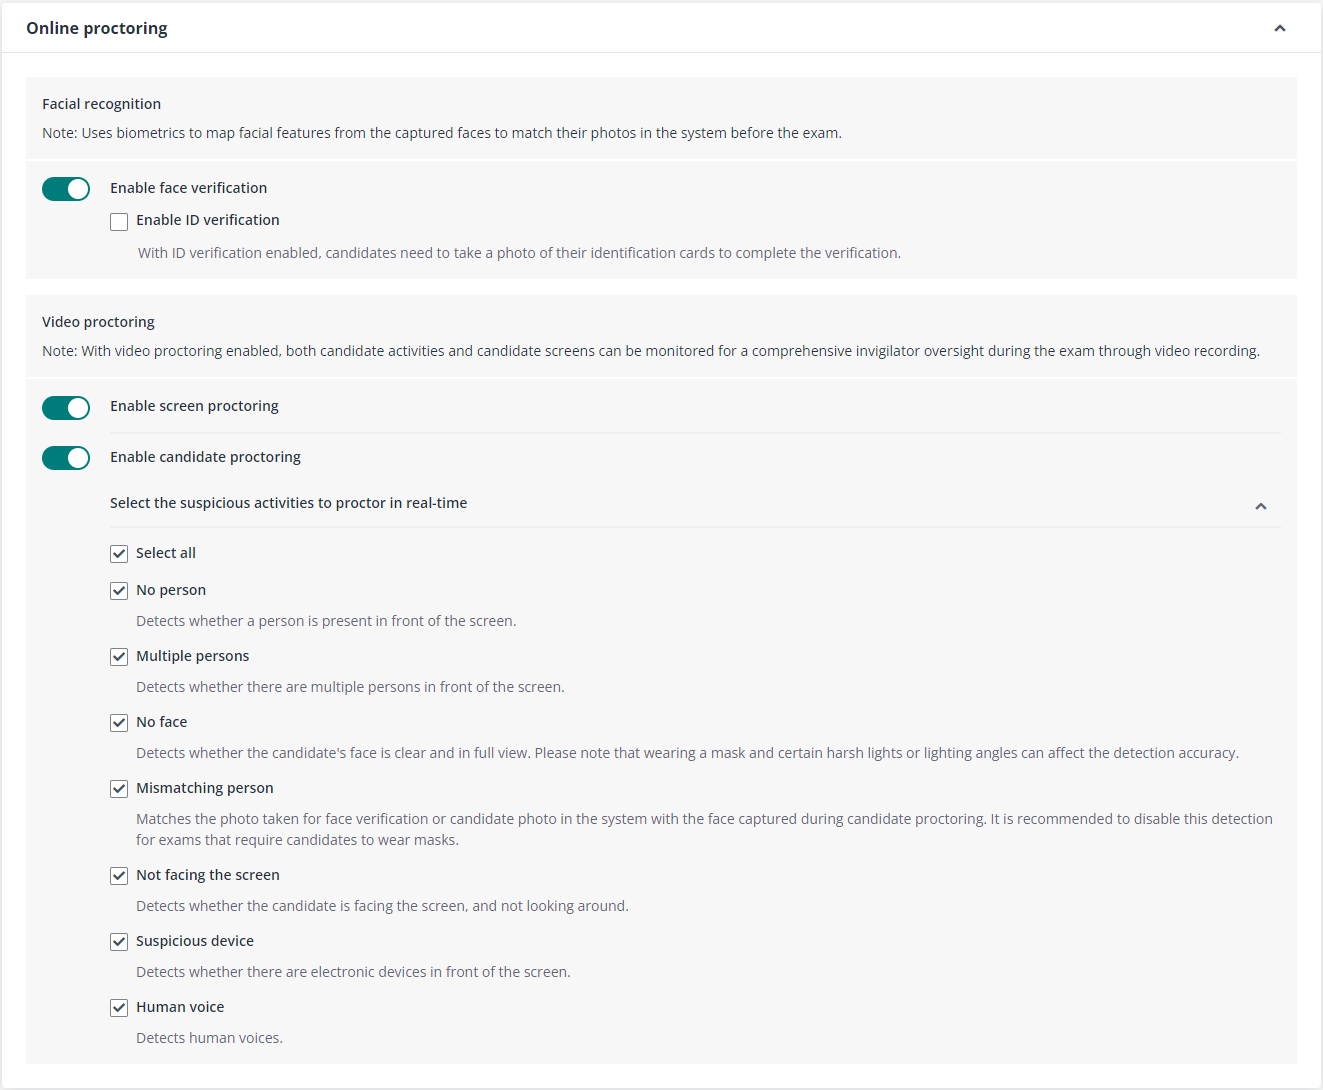
8. To use biometrics
to map facial features from the captured faces to match their photos in the
system before the exam, complete the facial recognition settings:
•
Enable face verification – With face verification enabled,
candidates need to take a photo that shows their full face from the front to
complete the verification.
•
Enable ID verification – With ID verification enabled,
candidates need to take a photo of their identification cards to complete the
verification.
To use online proctoring service
to monitor candidate activities and screens for a comprehensive invigilator
oversight during the exam, configure the video proctoring settings:
•
Enable screen proctoring to monitor candidate screens
during the exam.
•
Enable candidate proctoring to monitor candidate
activities, and you can then select the suspicious activities to proctor in
real-time by selecting the corresponding checkbox.
9. For the exam that
is closed-book, Do not allow access to the Internet is selected by
default in the Authorised URL section. To allow candidates to access
authorised URLs during the exam, select Allow access to specified URLs.
Click Add authorised URL to add an authorised URL.
•
Select Add existing authorised URLs to select the
authorised URLs prepared by the administrator.
•
Select Add authorised URL to add an authorised URL.
Sena can use one of the following methods to configure the
addresses that can be redirected from the URL:
o Click the Examena app
link in the How to authorise addresses? message to access Examena app.
Authorise the addresses that you want to allow candidates to be redirected from
the URL via Examena app.
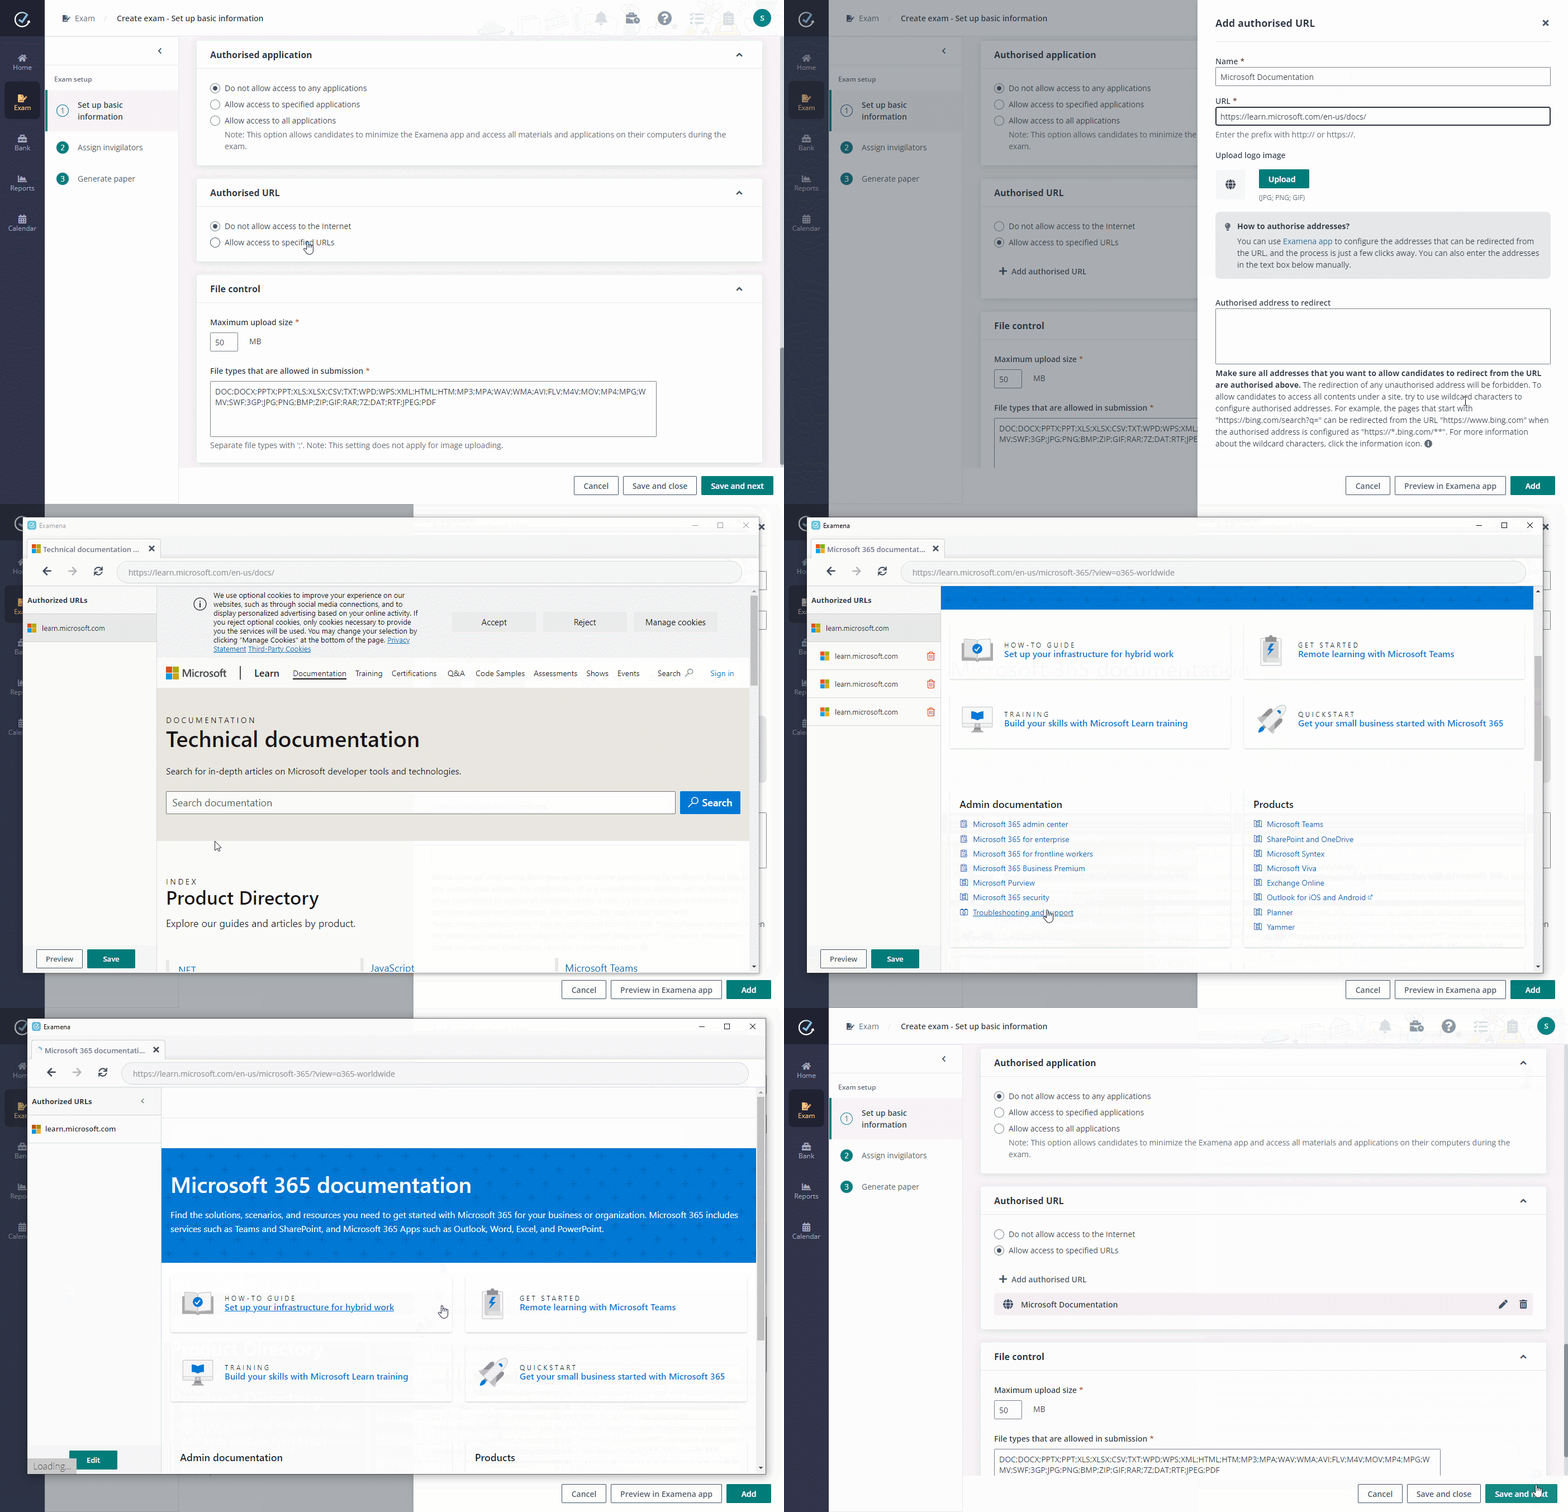
o Enter the URLs of the
addresses that can be redirected from the URL in the text box. Wildcard
characters are supported here.
*Note: If the website needs
login or authorisation and will redirect to another address, make sure the
address to be redirected is added here. For example, enter
https://login.microsoftonline.com/** for Microsoft Office Home.
10. For the exam that is
closed-book, Do not allow access to any applications is selected by
default in the Authorised application section.
To allow candidates to access the authorised applications
during the exam, select Allow access to specified applications. Click
Add authorised applications under Windows and/or Mac separately, select
the desired applications and click Add to add them as authorised
applications.
To allow candidates to access all applications during the
exam, select Allow access to all applications. Then, candidates are able
to minimize the Examena app during the exam. Candidate can access all materials
and applications on their computers, without a connection to the Internet.
11. Configure other settings for
the exam and click Save and next to go to the next step.
Then,
assign invigilators
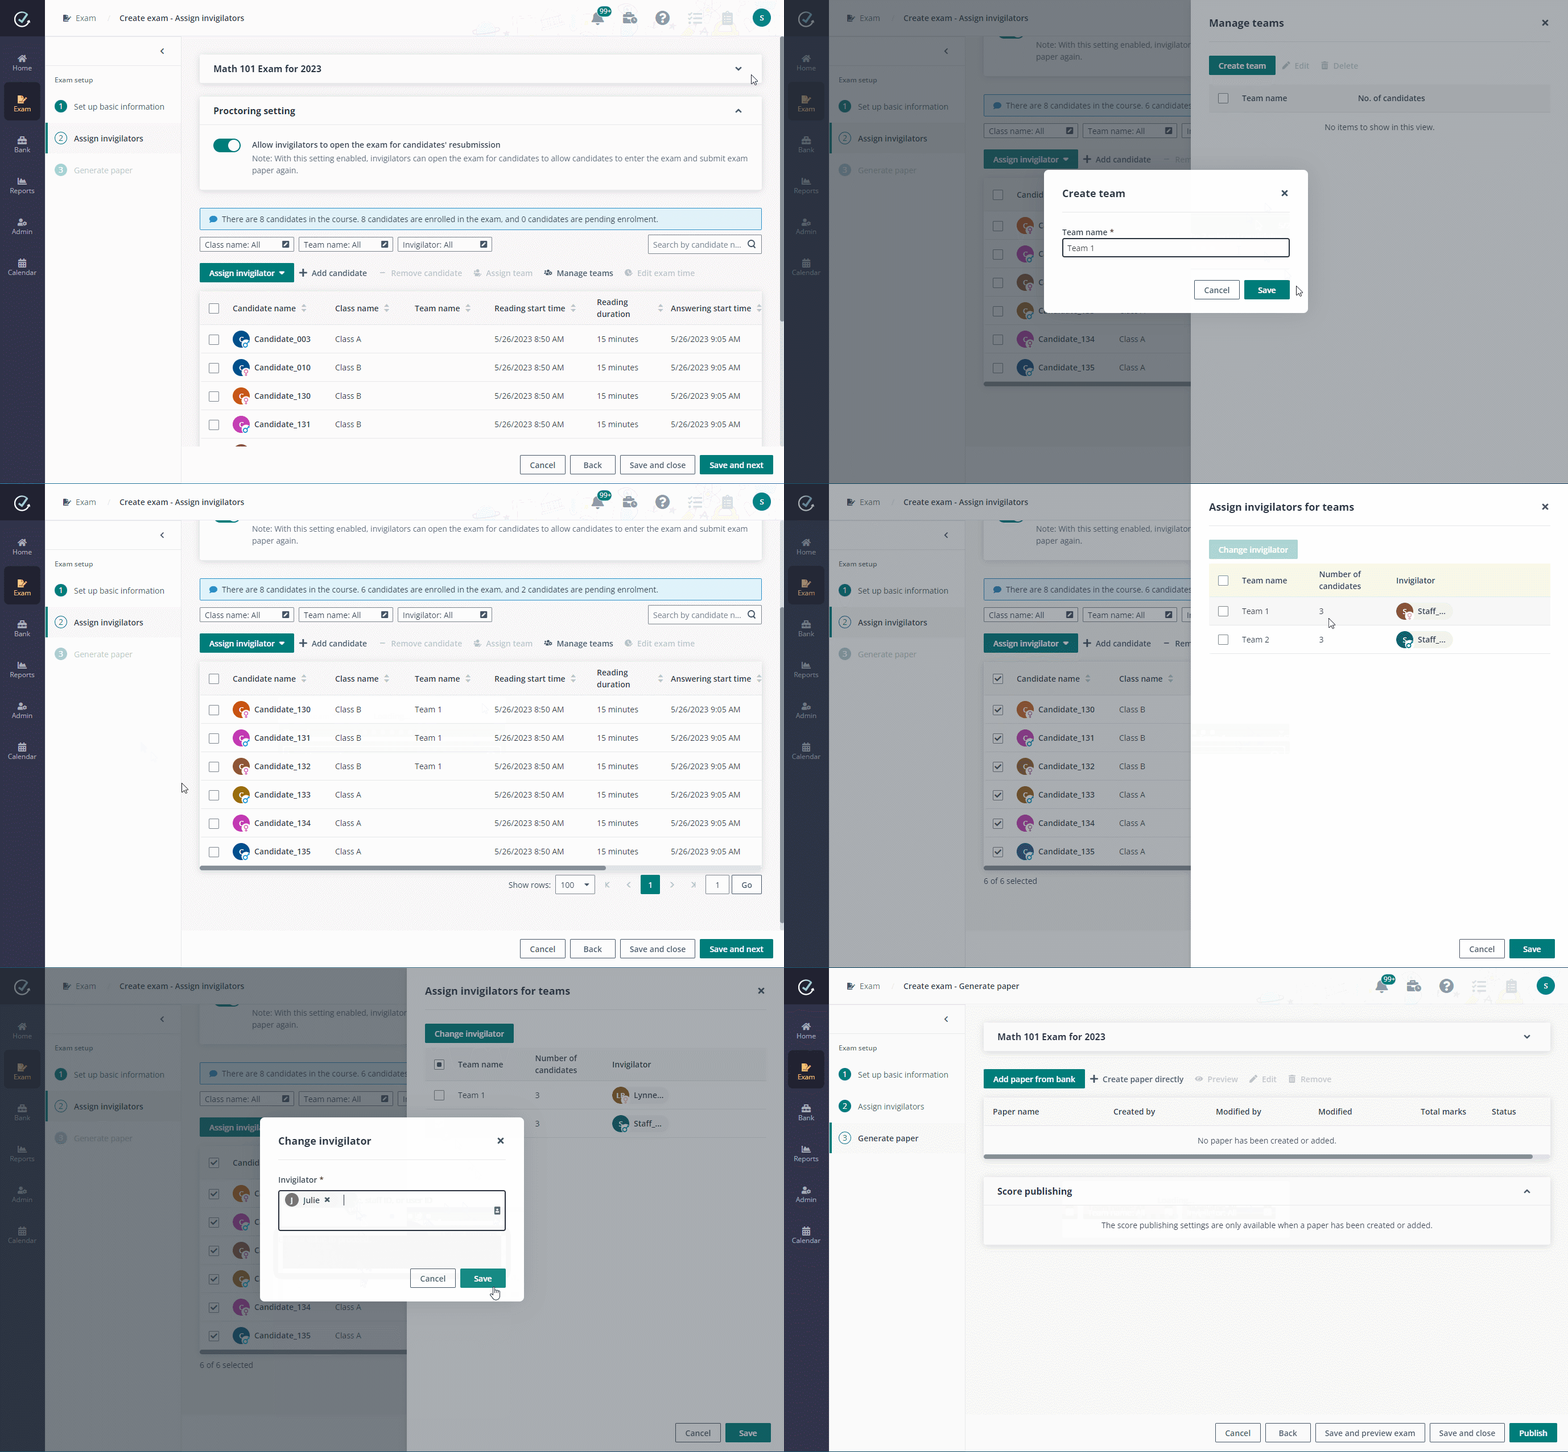
1. Choose whether to
allow invigilators to open the exam for candidates to resubmit their responses
by configuring the proctoring setting.
2. All candidates of
the course will be enrolled in the exam by default. You can remove candidates
from the exam by selecting the candidates and clicking Remove candidate.
3. The course
manager is the default invigilator. You can assign other invigilators to assist
you in the invigilation.
a. Select one or multiple candidates,
click Assign invigilator and select Assign invigilator for selected
candidates to assign invigilator for the selected candidates. To assign
invigilator for all candidates, click Assign invigilator and select
Assign invigilator for all.
b. Enter the staff name, staff ID, or
User ID in the text box and select the desired staff from the suggestion
list.
c. Click Save to add the
staff as invigilator.
4. If the candidates
of the course come from different classes, you can click Assign
invigilator and select Assign invigilator for classes.
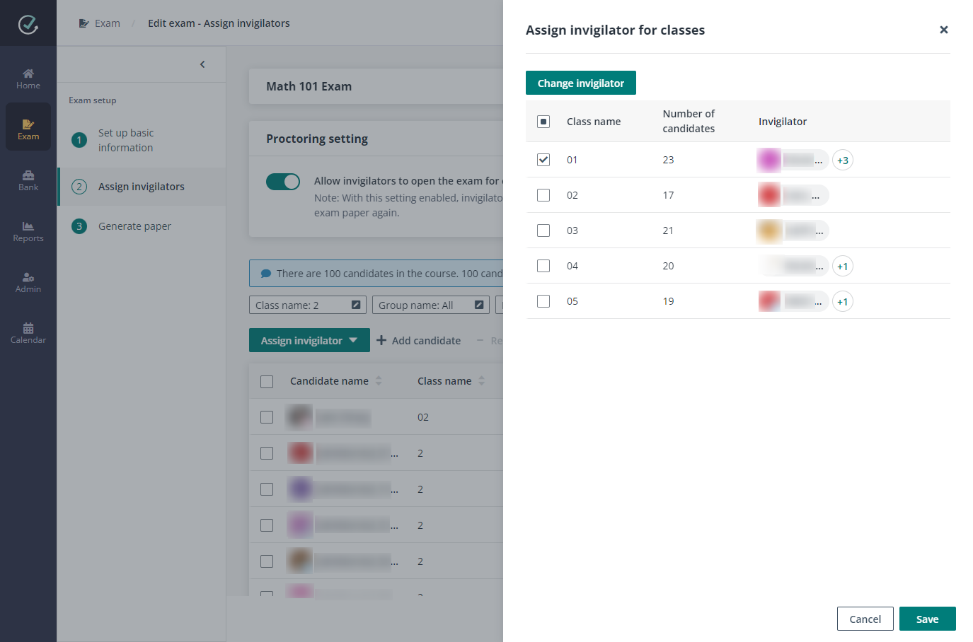
Select the classes for which you want to change
invigilator, and click Change invigilator.
5. If teams are
needed to classify candidates, you can click Manage teams. After clicking
Create team, enter a team name and click Save to create a
team.
6. Select the
candidates that you want to assign to the team, and click Assign team.
Select the team and click OK to assign the candidates to the team.
7. Click Assign
invigilator and select Assign invigilators for teams to display teams
with assigned invigilators.
Select one or multiple teams and click Change
invigilator to change the invigilator assignment for the teams.
8. For exams with
fixed time range, you can select candidates and click Edit exam time to
edit the exam time for the candidates that have special needs.
9. Click Save and
next to go to the next step.
Sena can generate a
paper for the
exam using one
of the following methods:
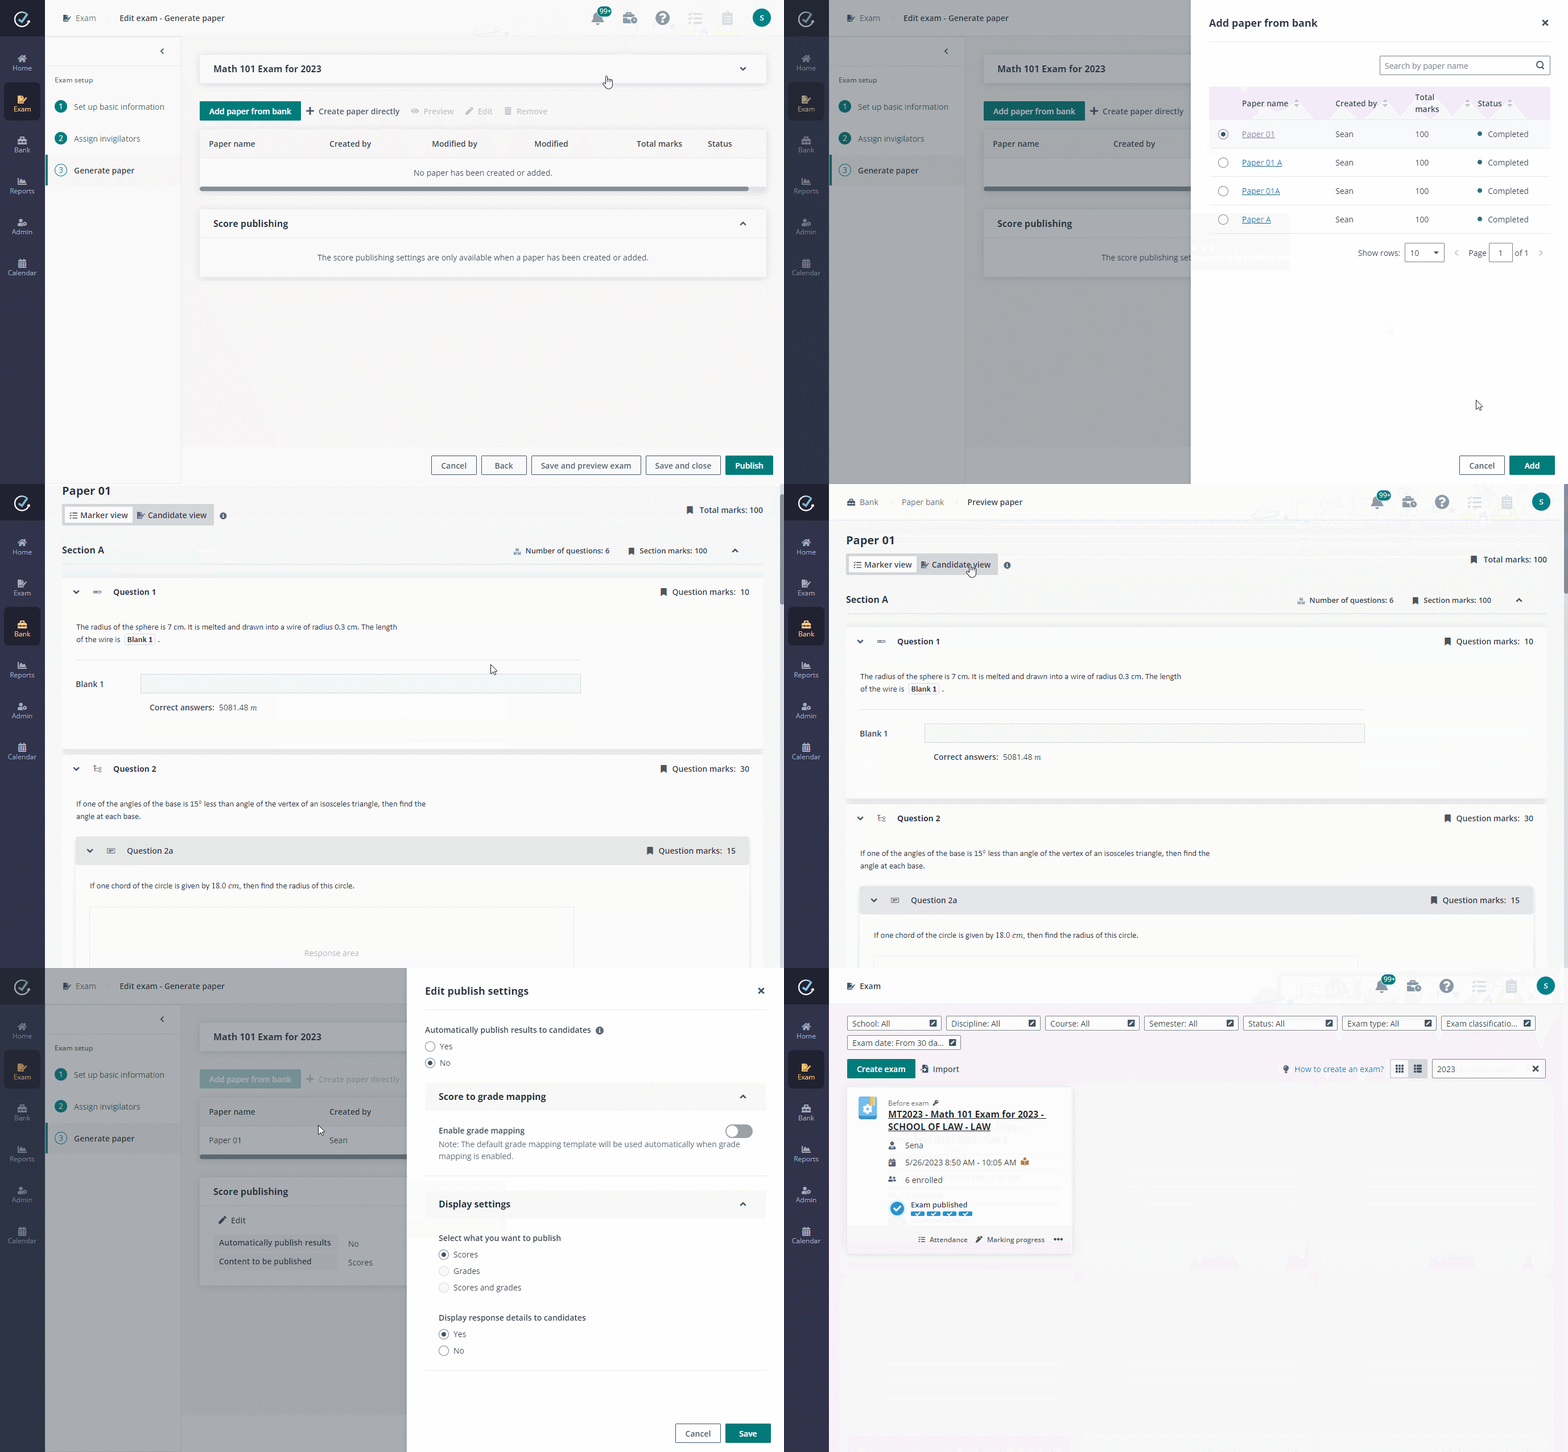
• Add
paper from bank
Click Add paper from
bank, select an existing paper from the paper bank, and click Add to
add the paper to the exam. After generating a paper for the exam, she clicks
Preview to preview the paper in marker view or candidate view. She can
also clicks Save and preview exam to save the exam and preview it in a
new tab or via Examena app based on the exam type. When the exam is ready, she
clicks Publish to publish the exam.
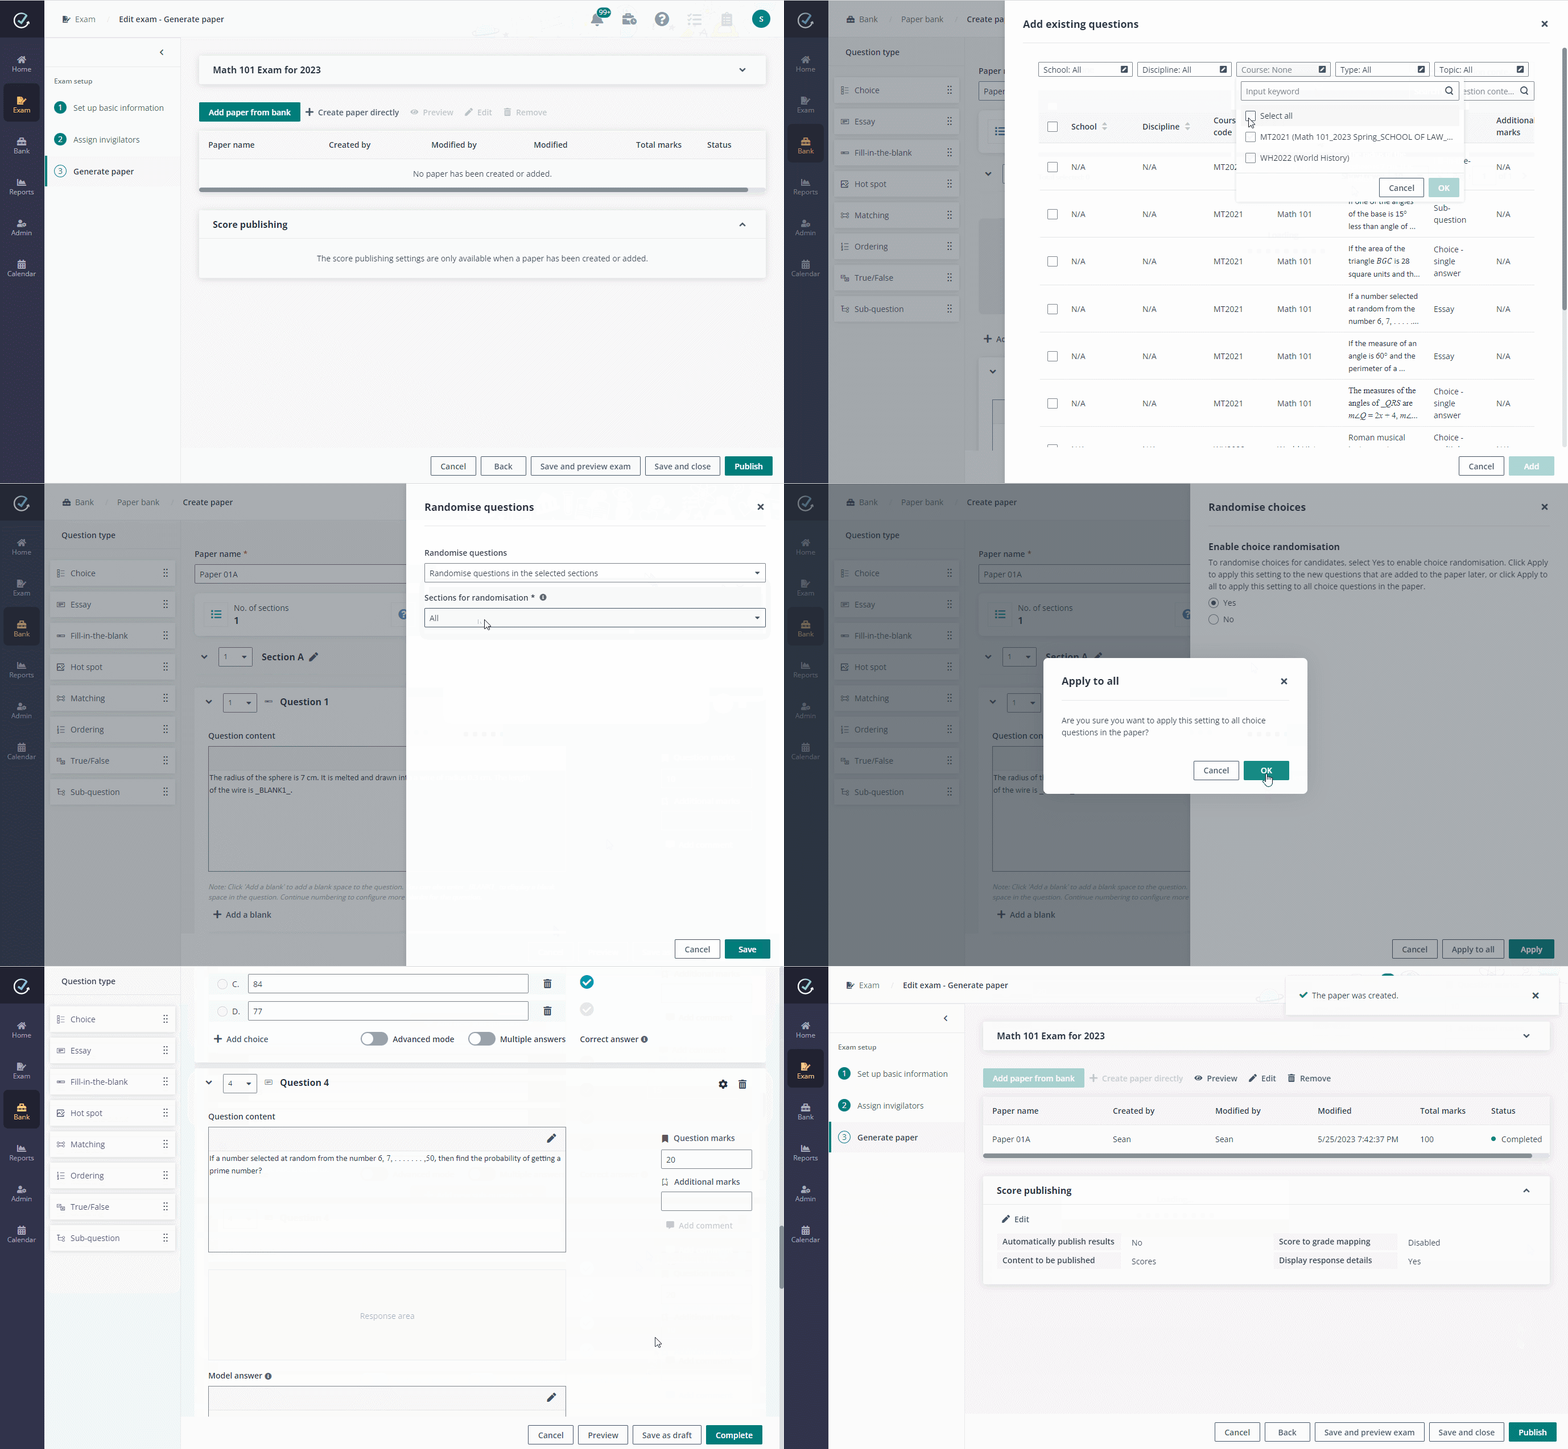
• Create
paper directly
Click Create paper
directly to create a new paper for the exam. Enter a name for the paper and
configure questions. When she finishes the paper configuration, she clicks
Complete to make the paper Completed. For detailed information on
how to create questions, refer to How to create a question?.
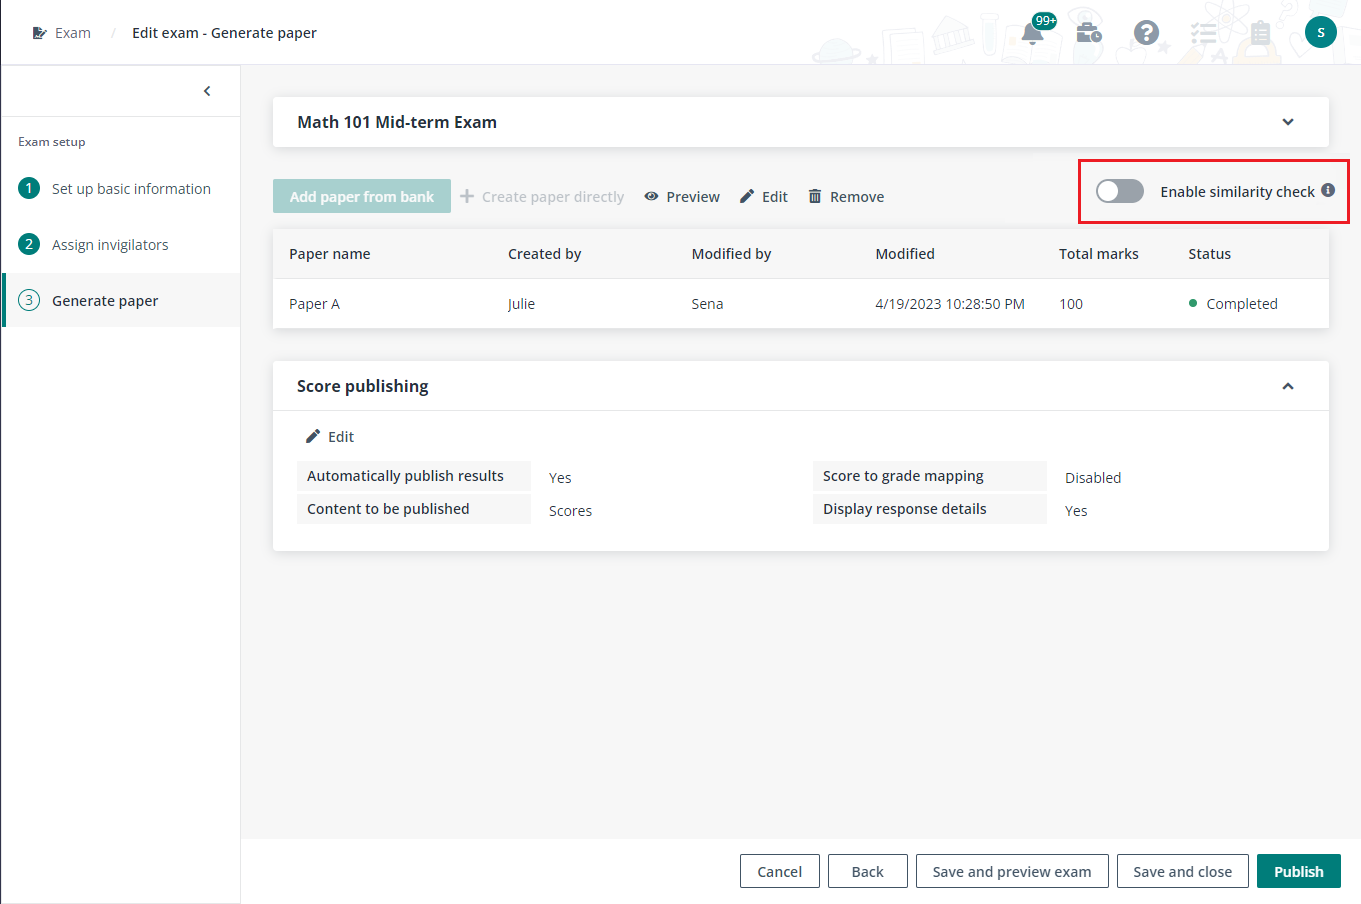
Sena can choose whether to enable similarity check for the
exam. With similarity check enabled, each candidate response of Essay questions
in the paper used by the exam will have a similarity score which represents the
percentage of text that is similar to the content in the configured search
repositories.
Sena can configure publish settings after a paper has been
configured by clicking Edit in the Score publishing section. In
the Edit publish settings window, complete the following settings and
click Save to save the publish settings for the exam.
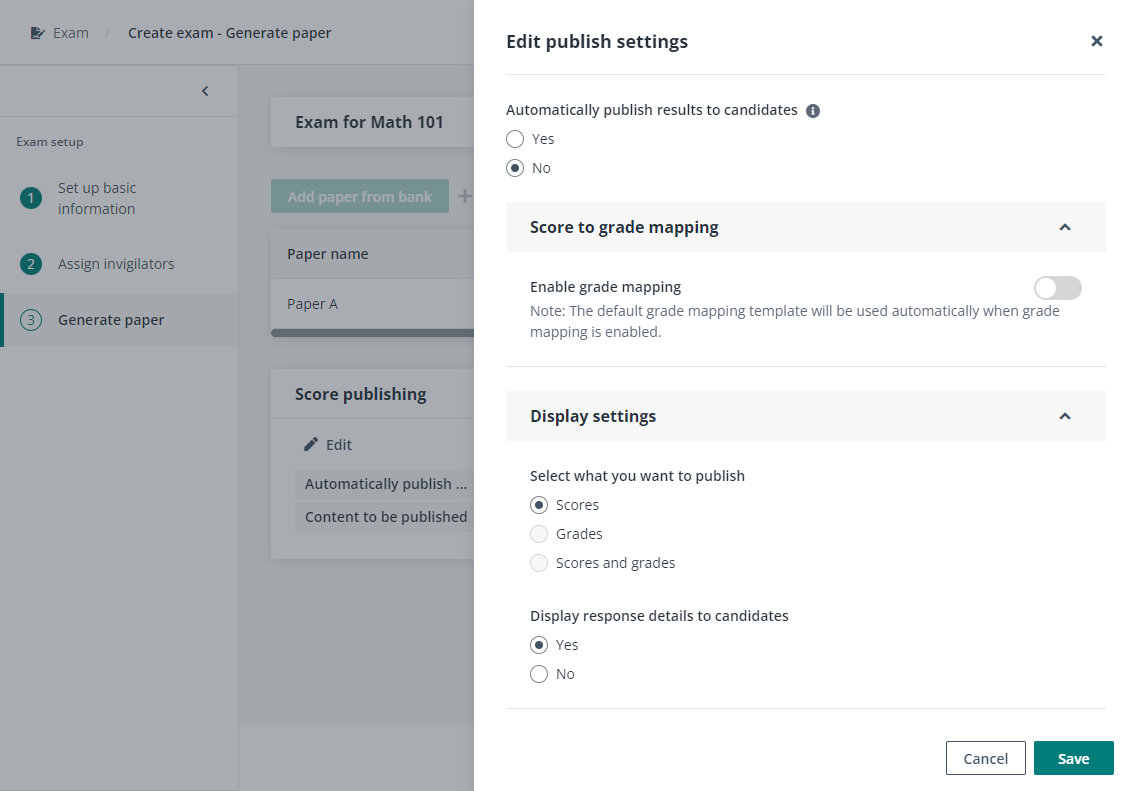
•
Select Yes or No in the Automatically publish
results to candidates field to decide whether to automatically publish exam
results for the submitted candidates. Only when all questions in the paper are
close-ended questions, which can be automatically marked, will the exam results
be published to the submitted candidates automatically.
•
Click the toggle button under Score to grade mapping to
enable score to grade mapping for this exam.
If there is a default mapping template configured by the
administrator, the score to grade mapping will be enabled automatically for this
exam.
o Configure the score to grade
mapping directly. Enter a number in Score from and a grade to define a
mapping, and click Add mapping to add more mappings.
o When the default mapping
template is automatically applied for the exam, you can adjust the grade mapping
based on the default template, and click Save to save changes to the
grade mapping for the exam.
o You can also click Change
grade mapping template, select a template from the drop-down list, and click
Apply to apply the selected mapping template to the exam. You can further
edit the grade mapping to meet your requirement for the exam, and click
Save to save changes.
•
Select Scores, Grades, or Scores and grades
to be published to candidates.
•
Select Yes or No in the Display response details
to candidates field to decide whether to display response details to
candidates together with the exam results.
Sena clicks Publish to publish the exam. Published
exams can be unpublished at any time before the exam starts.
To create a similar exam for the same course or reuse these
exam settings, Sena can duplicate this exam from the Exam page. Sena will
be brought to the Edit exam - Set up basic information page with
the same exam settings duplicated. Then, Sena can edit the exam as
required.


