Mark scores for written exams
The steps that markers follow to complete the marking process
can vary, depending on the marking process used, the type of exam, and whether
the process includes the use of rubrics or AI assistance.
Mark scores with regular marking process
Let’s see how the markers of Math 101 mid-term exam can mark
scores when the exam uses the regular marking process.
1. After the Math
101 mid-term exam completes, the assigned markers can sign into MaivenPoint
Online Services and go to Examena to mark the scores for the assigned candidates
and/or questions.
2. On the
Exam page, search for the exam or use the Status
filter to find the exam for marking.
3. Click Marking
progress to enter the page to mark scores.
*Note: The system
automatically marks questions of the Choice (single answer & multiple
answers), Fill-in-the-blank, True/False, Matching, Categorisation, and Hot spot
types. You can also edit the score manually, if required.
4. By default, the
All columns view is selected with all columns displayed in the table. You
can click the view name and click Manage views in the drop-down list to
access the Manage views window.
a. Click Create view on the left
pane.
a. Enter a name for the custom view,
choose whether to set it as the default view, and click Save.
b. On the right pane, select the columns
that you want to display in the table and arrange them in desired order.
c. Click Save to save the
view settings.
5. You can flag all
candidates or selected candidates if required. After clicking Flag
candidate and then Flag selected candidates/Flag all
candidates, select a flag colour and click Save to flag the
candidates with the selected flag colour.
Click the flag next to a candidate name to view the flag
history for the candidate, including the flag added to this candidate
responses.
6. With questions
assigned, you can mark score for uncompleted questions across all candidates
under the Question view.
a. Select the Only show uncompleted
questions
option to update the view.
b. Click Mark score next to an
uncompleted question.
c. Mark the score for the
candidate one by one.
d. You can add one or multiple comments
for candidates and staff if required. Then, you can edit or delete the comments
you added. The comment changes can all be viewed in the marking history.
e. Click Close
after marking completes.
If similarity check is enabled for the exam, the
Similarity score column is visible in the table. When candidate responses
of Essay or File upload questions are submitted, the View details link is
clickable, and you’ll be brought to the Similarity checking page where
you can view the similarity scores of candidate responses.
If the optional question setting is turned on for a section
of the exam paper, you can view two different icons in the upper-left corner of
the question indexes to see whether each question score is counted in the final
score.
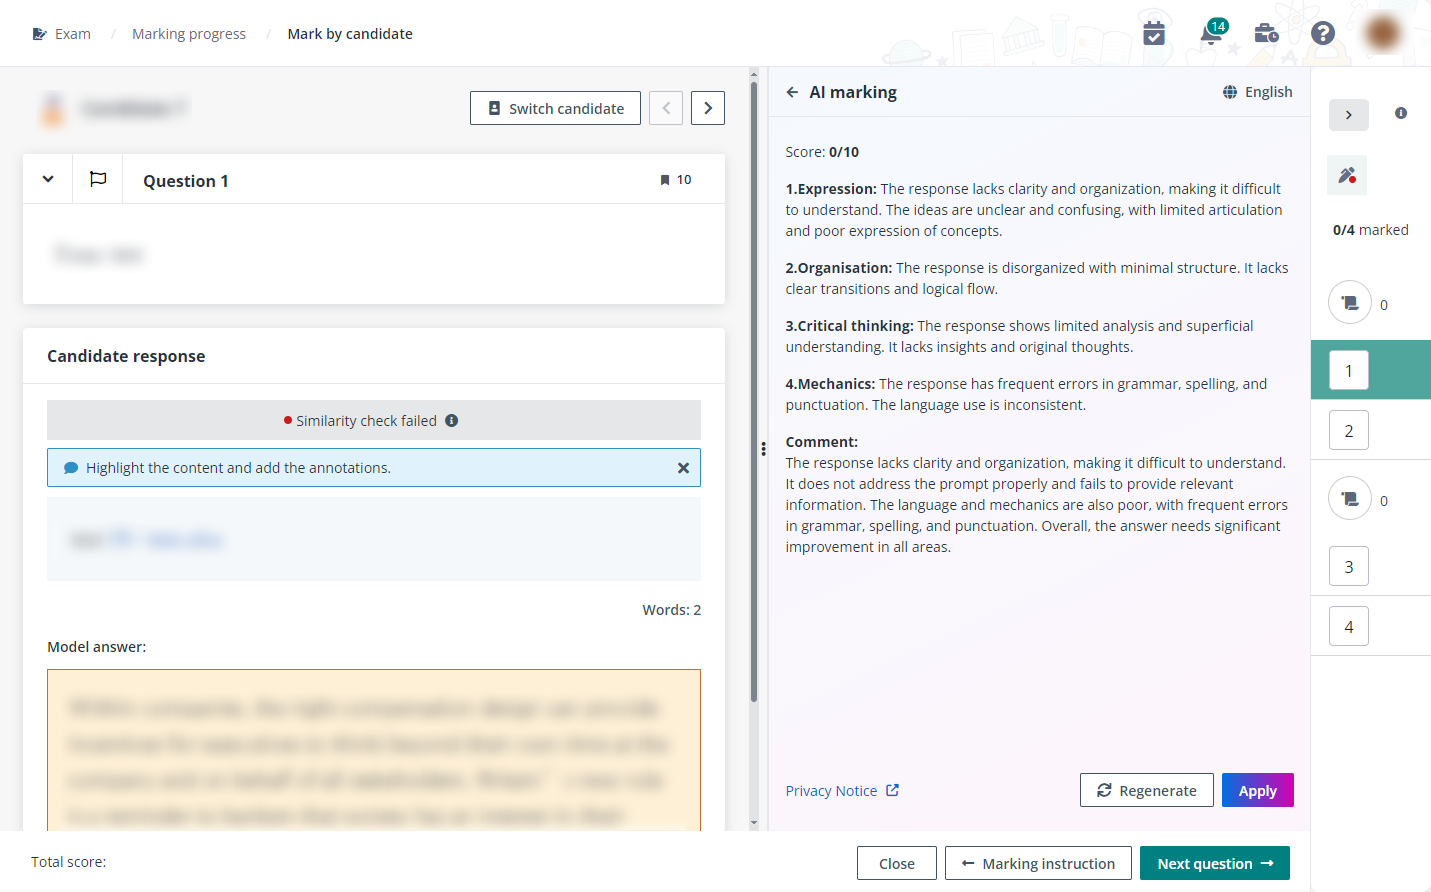
7. With candidates
assigned, you can mark score for uncompleted candidates across all questions
under the Candidate view.
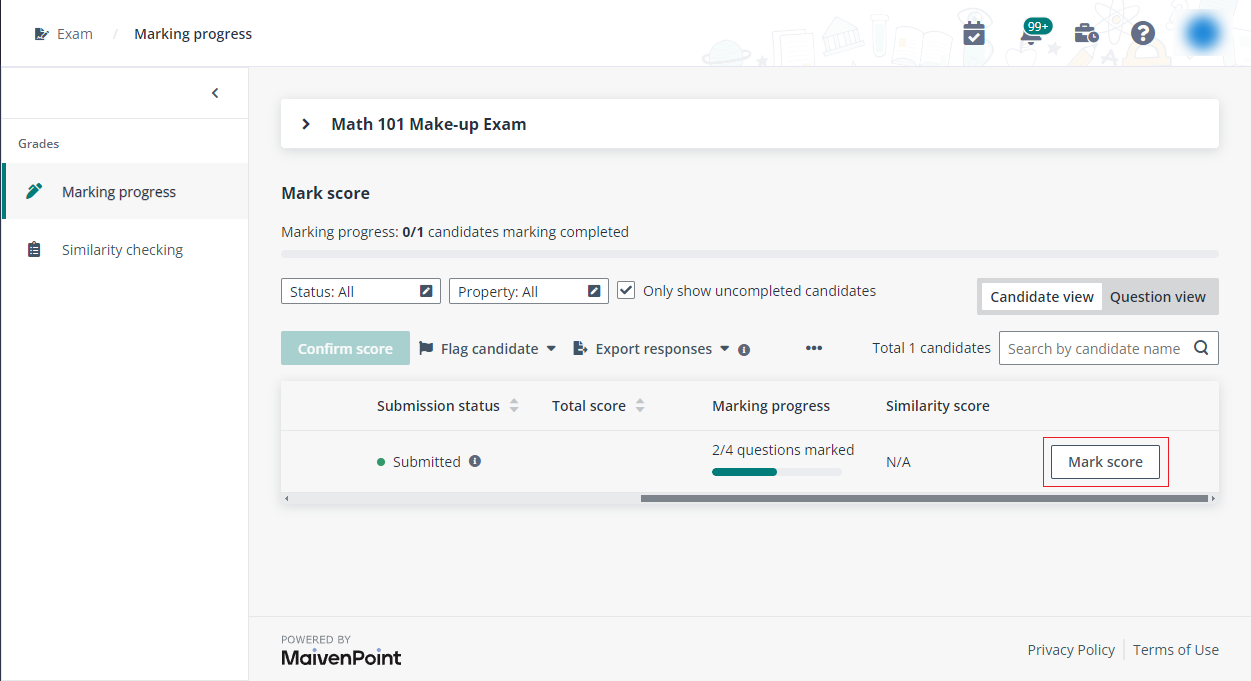
a. You can select the Only show
uncompleted candidates
option to update the view.
b. Click Mark score next to an
uncompleted candidate.
c. Mark the score for the question
one by one.
d. You can add comment for candidates
and staff if required. Then, you can edit or delete the comments you added. The
comment changes can all be viewed in the marking history.
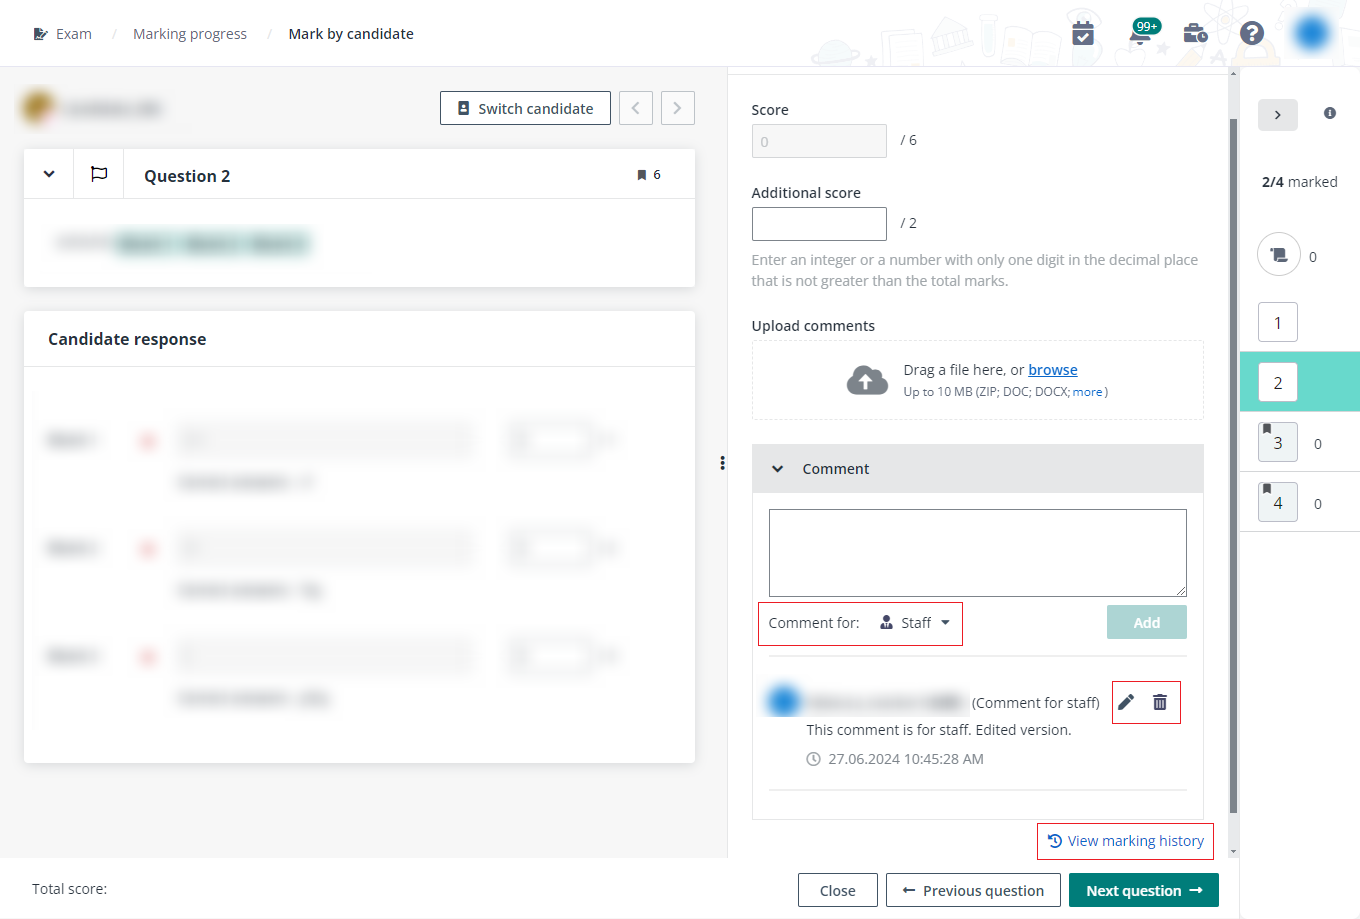
e. You can flag the candidate response
which needs further discussion by clicking the flag button to the left of the
question index and selecting a flag colour. When there is no doubt about the
candidate response, you can clear flag from the candidate response.
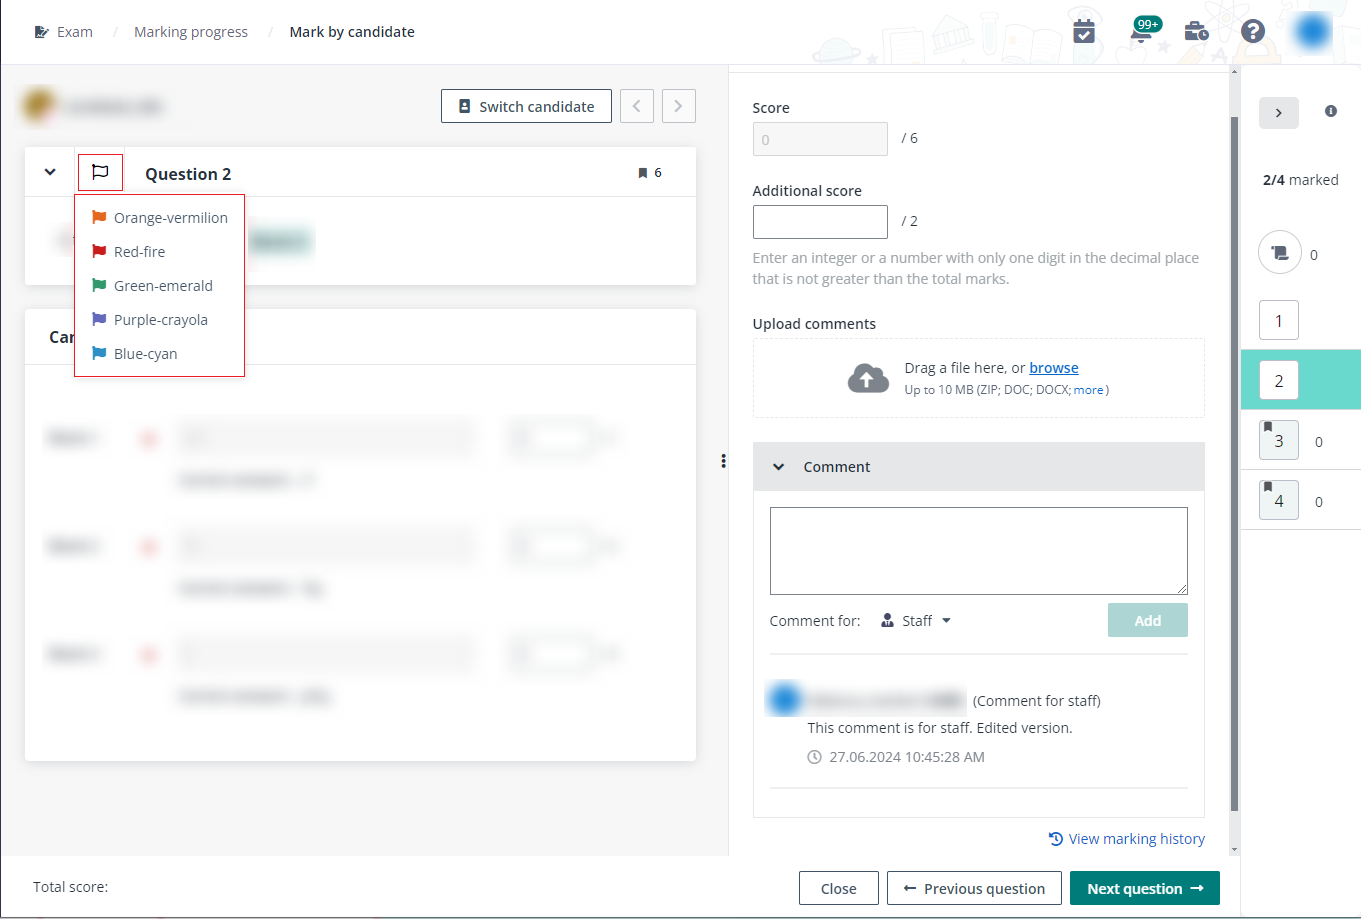
f. If the exam has additional
score, marking guide, and/or appendix and reference file configured, click
Marking instruction to view details.
g. Click Close
after marking completes.
If similarity check is enabled for the exam, the
Similarity score column is visible and shows the similarity scores of
each candidate’s Essay responses.
•
If there is only one Essay or File upload question, the similarity
score of each candidate response to the question will be displayed. Click the
score link to view the corresponding Turnitin similarity report.
•
If there are multiple Essay or File upload questions, the overall
similarity score of each candidate at exam paper level will be displayed as well
as the View details link after candidate responses are submitted. Click
the score link to view the corresponding Turnitin similarity report, or click
the View details link to access the Similarity checking page where
you can view the overall similarity score of each candidate at exam paper level
and similarity scores of candidate responses at question level.
8. On the
Similarity checking page, you can view the similarity score of each
candidate response to Essay questions. Clicking the score link allows you to
view the Turnitin similarity report.
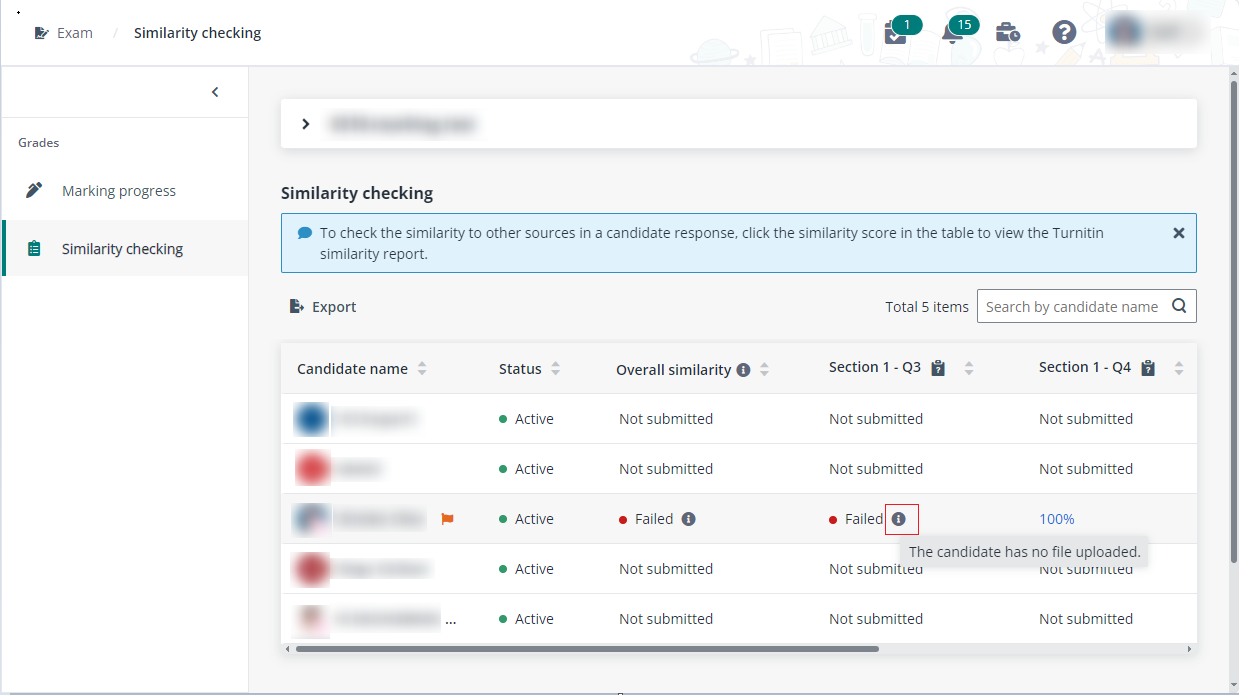
If the similarity checking failed, you can view the reason
by clicking the information icon to the right.
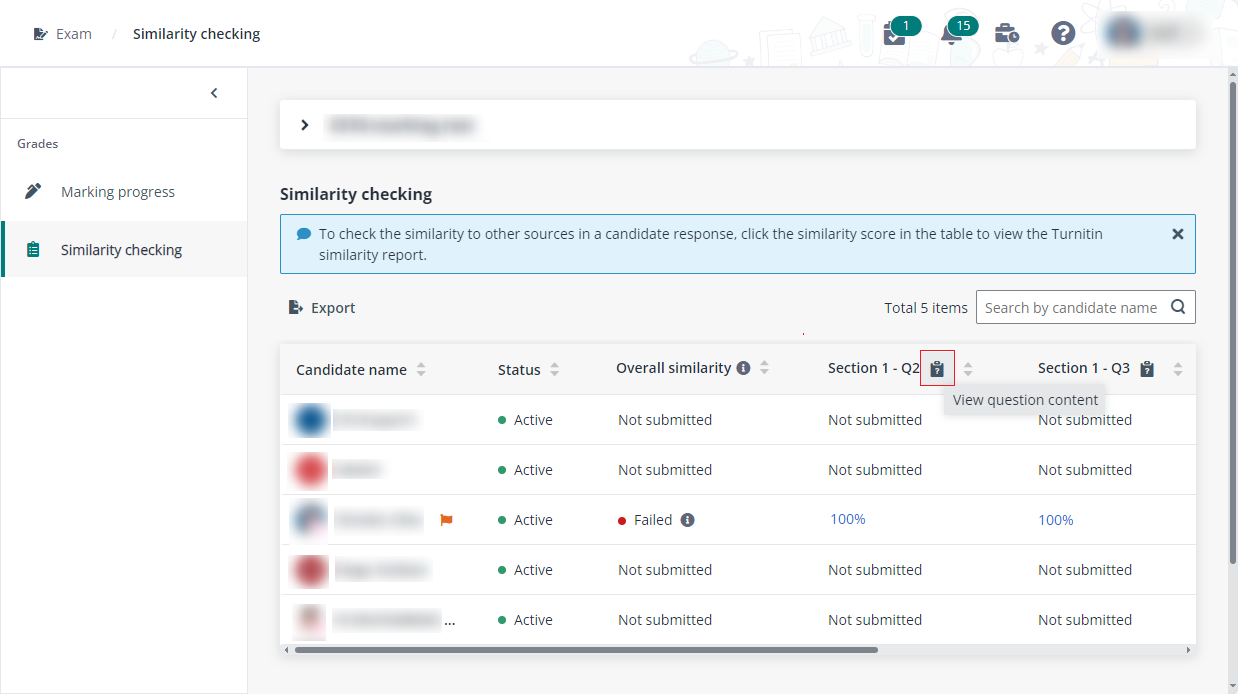
The content of each question can be viewed by clicking the
View question content to the right of the question index.
9. You can also
export responses for specific candidates/questions or all submitted
candidates/questions to mark scores in the Excel file. The scores marked in the
Excel file can be imported back to Examena. You can follow the steps below:
a. Click Export responses >
Export responses for all.
a. Locate the downloaded .zip file and
extract it.
b. Find and open the file named in the
format of
Candidate_Responses_School-Discipline-CourseCode-Semester_ExamName.xlsx.
You can mark scores in this file and add comments or provide feedback to
candidates as well.
c. The comments added by staff can
be viewed in the file named in the format of
Comments_ExamName_DateAndTime.docx.
d. You can view the files uploaded by
candidates by clicking the file name links in the Candidate response
column. The files can also be found in the extracted folder.
e. The marking scheme of questions,
marking guide, appendix and reference file can be viewed in the PDF file that
named in the format of CourseCode – CourseName – Semester – ExamName.pdf.
The attached files in marking scheme, marking guide, appendix and reference file
fields can also be found in the extracted folder.
f. After viewing the candidate
responses, mark score and add your comments in the columns that are highlighted.
g. When you complete marking in the
file, save changes to the file and close it.
h. Go back to the Marking
progress page, click Import response scores to import your given
scores and comments to Examena.
*Note: This is only
available for the following question types: Choice – single answer, Choice –
multiple answers, Essay, File upload, Fill-in-the-blank, Sub-question,
True/False, Ordering, Secured Excel, WordDoc assignment, and Multiple
drop-down.
10. After all candidate
responses have scores marked, you can click Confirm scores to confirm the
scores are correct. The confirmed scores cannot be edited anymore.
Mark scores with double-blind marking process
Let’s see how the markers of Math 101 mid-term exam can mark
scores when the exam uses the double-blind marking process.
1. After the Math
101 mid-term exam completes, the assigned markers can sign into MaivenPoint
Online Services and go to Examena to mark the scores for the assigned candidates
and/or questions.
2. On the
Exam page, search for the exam or use the Status
filter to find the exam for marking.
3. Click Marking
progress to enter the page to mark scores.
*Note: The system
automatically marks questions of the Choice (single answer & multiple
answers), Fill-in-the-blank, True/False, Matching, Categorisation, and Hot spot
types. You can also edit the score manually, if required.
4. By default, the
All columns view is selected with all columns displayed in the table. You
can click the view name and click Manage views in the drop-down list to
access the Manage views window.

a. Click Create view on the left
pane.
b. Enter a name for the custom view,
choose whether to set it as the default view, and click Save.
c. On the right pane, select the
columns that you want to display in the table and arrange them in desired
order.
d. Click Save to save the view
settings.
5. You can flag all
candidates or selected candidates if required. After clicking Flag
candidate and then Flag selected candidates/Flag all
candidates, select a flag colour and click Save to flag the
candidates with the selected flag colour.
Click the flag next to a candidate name to view the flag
history for the candidate, including the flag added to this candidate
responses.
6. With questions
assigned, you can mark score for uncompleted questions across all candidates
under the Question view.

a. Select the Only show uncompleted
questions
option to update the view.
b. Click Mark score next to an
uncompleted question.
c. Mark the score for the
candidate one by one.
d. You can add one or multiple comments
for candidates and staff if required. Then, you can edit or delete the comments
you added. The comment changes can all be viewed in the marking history.

e. Click Close
after marking completes.
If similarity check is enabled for the exam, the
Similarity score column is visible in the table. When candidate responses
of Essay or File upload questions are submitted, the View details link is
clickable, and you’ll be brought to the Similarity checking page where
you can view the similarity scores of candidate responses.
If the optional question setting is turned on for a section
of the exam paper, you can view two different icons in the upper-left corner of
the question indexes to see whether each question score is counted in the final
score.

7. With candidates
assigned, you can mark score for uncompleted candidates across all questions
under the Candidate view.

a. You can select the Only show
uncompleted candidates
option to update the view.
b. Click Mark score next to an
uncompleted candidate.
c. Mark the score for the question
one by one.
d. You can add comment for candidates
and staff if required. Then, you can edit or delete the comments you added. The
comment changes can all be viewed in the marking history.

e. You can flag the candidate response
which needs further discussion by clicking the flag button to the left of the
question index and selecting a flag colour. When there is no doubt about the
candidate response, you can clear flag from the candidate response.

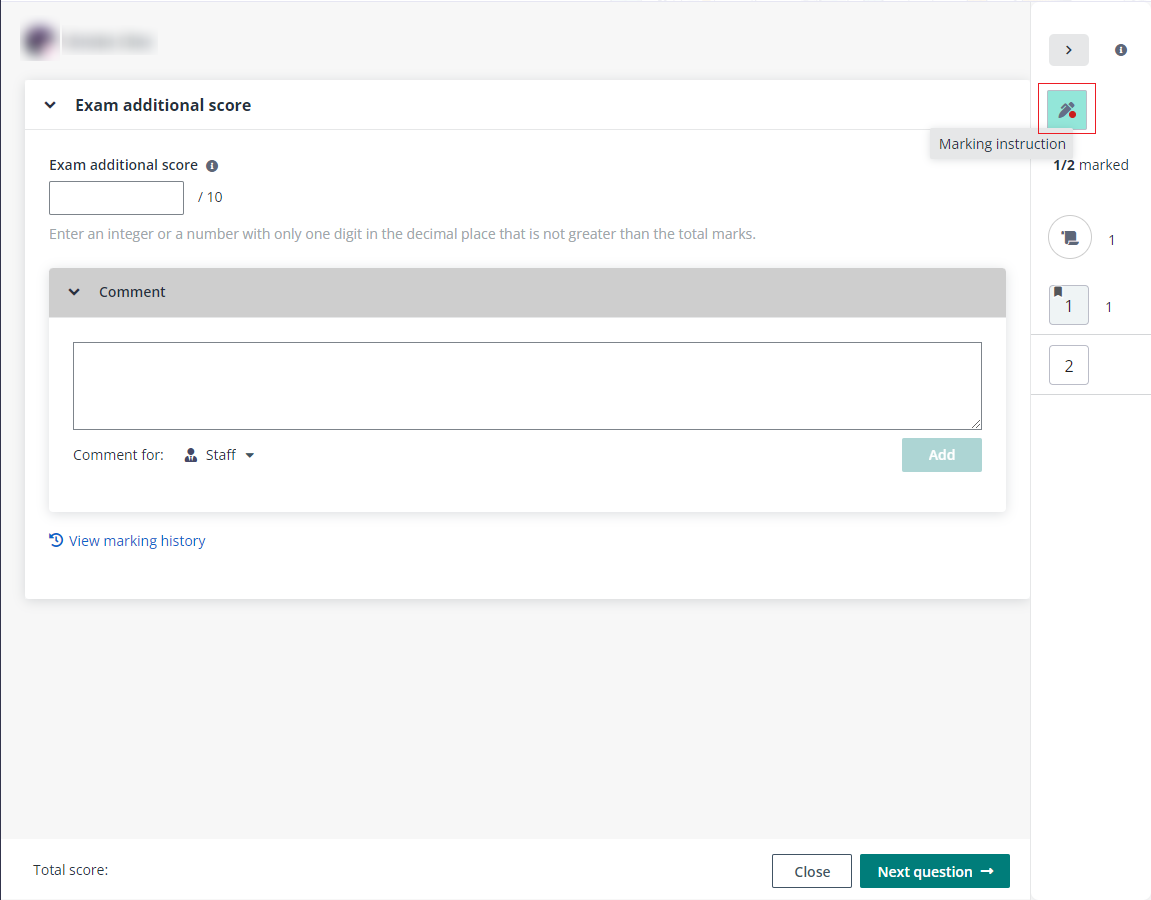
f. If the exam has additional
score, marking guide, and/or appendix and reference file configured, click
Marking instruction to view details.
g. Click Close
after marking completes.
If similarity check is enabled for the exam, the
Similarity score column is visible and shows the similarity scores of
each candidate’s Essay or File upload responses.
•
If there is only one Essay or File upload question, the similarity
score of each candidate response to the question will be displayed. Click the
score link to view the corresponding Turnitin similarity report.
•
If there are multiple Essay or File upload questions, the overall
similarity score and the View details link is clickable after candidate
responses are submitted. You can click the overall similarity score link to view
the corresponding Turnitin similarity report, and click the View details
link to access the Similarity checking page where you can view the
overall similarity scores of candidates and similarity scores of candidate
responses.
8. On the
Similarity checking page, you can view the overall similarity score of
each candidate and the similarity score of each candidate response to Essay or
File upload questions. Clicking the score link allows you to view the Turnitin
similarity report.
If the similarity checking failed, you can view the reason
by clicking the information icon to the right.

The content of each question can be viewed by clicking the
View question content to the right of the question index.

9. You can also
export responses for specific candidates/questions or all submitted
candidates/questions to mark scores in the file. You can follow the steps
below:
a. Click Export responses >
Export responses for all.
b. Locate the downloaded .zip file and
extract it.
c. Find and open the file named in
the format of
Candidate_Responses_School-Discipline-CourseCode-Semester_ExamName_DateTime.xlsx.
d. You can view the files uploaded by
candidates by clicking the file name links in the Candidate response
column. The files can also be found in the extracted folder.
e. After viewing the candidate
responses, mark score and add your comments in the columns that are highlighted.
f. When you complete marking in
the file, save changes to the file and close it.
g. Go back to the Marking
progress page, click Import response scores to import your given
scores and comments to Examena.
*Note: This is only
available for the following question types: Choice – single answer, Choice –
multiple answers, Essay, File upload, Fill-in-the-blank, Sub-question,
True/False, Ordering, Secured Excel, WordDoc assignment, and Multiple
drop-down.
10. After all candidate
responses have scores marked, you can click Complete marking to confirm
the scores.
11. If there is any disagreement
about the scores, the supervisor will return the scores to you for adjustment.
You can perform one of the following actions:
•
Edit the scores and click Complete marking again
•
Click Escalate to supervisor if you insist on the given
scores.
Mark scores with rubrics
If the assigned question has rubric configured, markers can
mark scores for criteria in the rubric and the given score of the candidate
response will be calculated automatically.
Let’s see how the markers of World History mid-term exam can
mark scores with rubrics.
1. After the World
History mid-term exam completes, the assigned markers can sign into MaivenPoint
Online Services and go to Examena to mark the scores for the assigned candidates
and/or questions.
2. On the
Exam page, search for the exam or use the Status
filter to find the exam for marking.
3. Click Marking
progress to enter the page to mark scores.
4. Click Mark
score to the right of a candidate or question to mark score for candidate
responses.
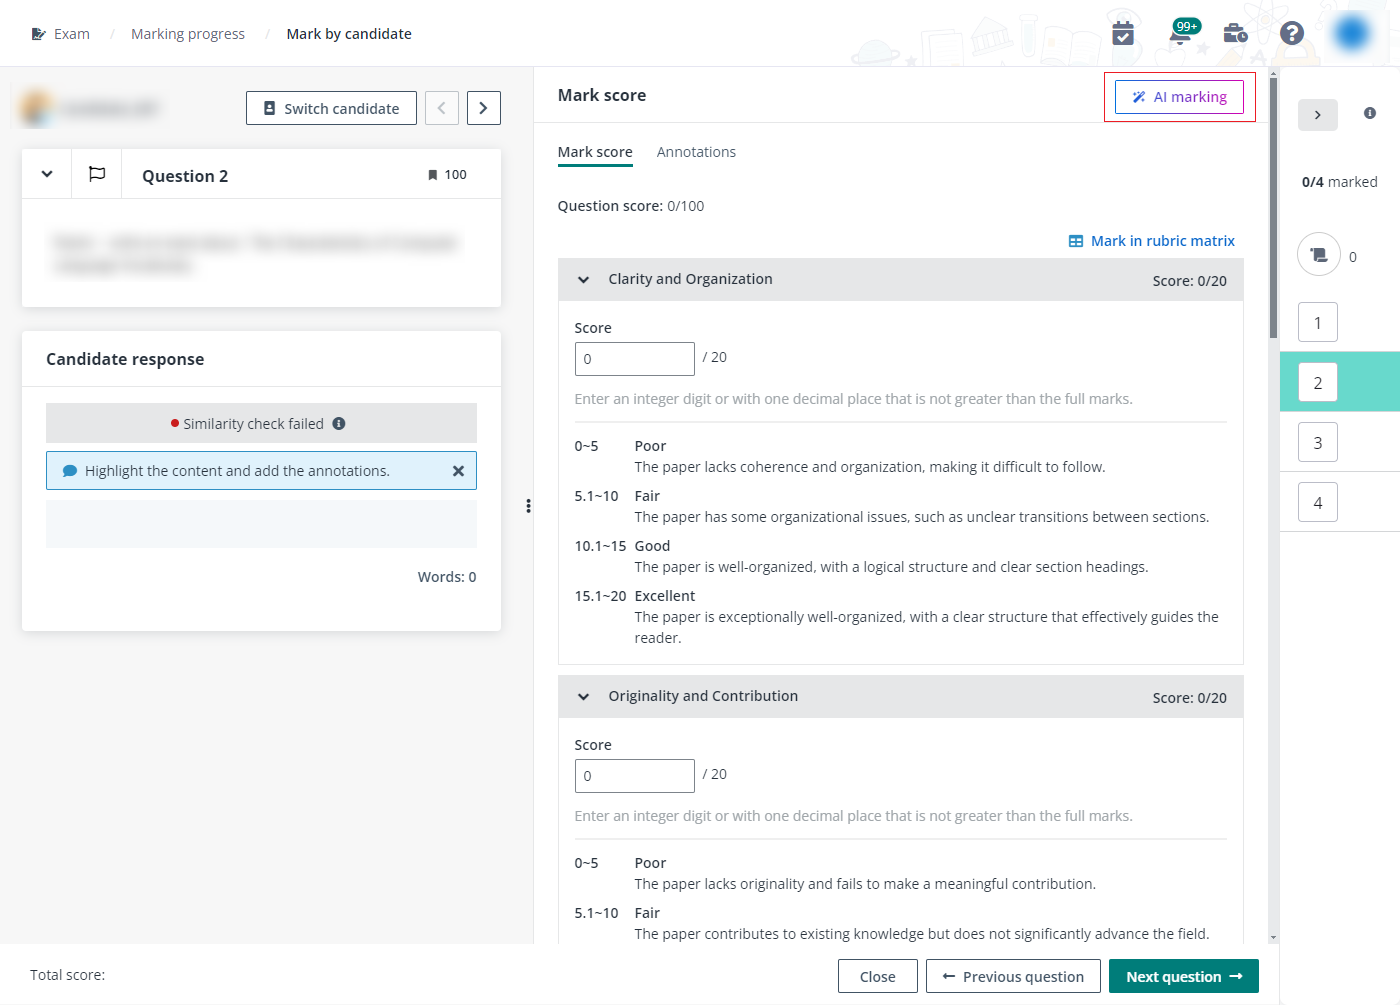
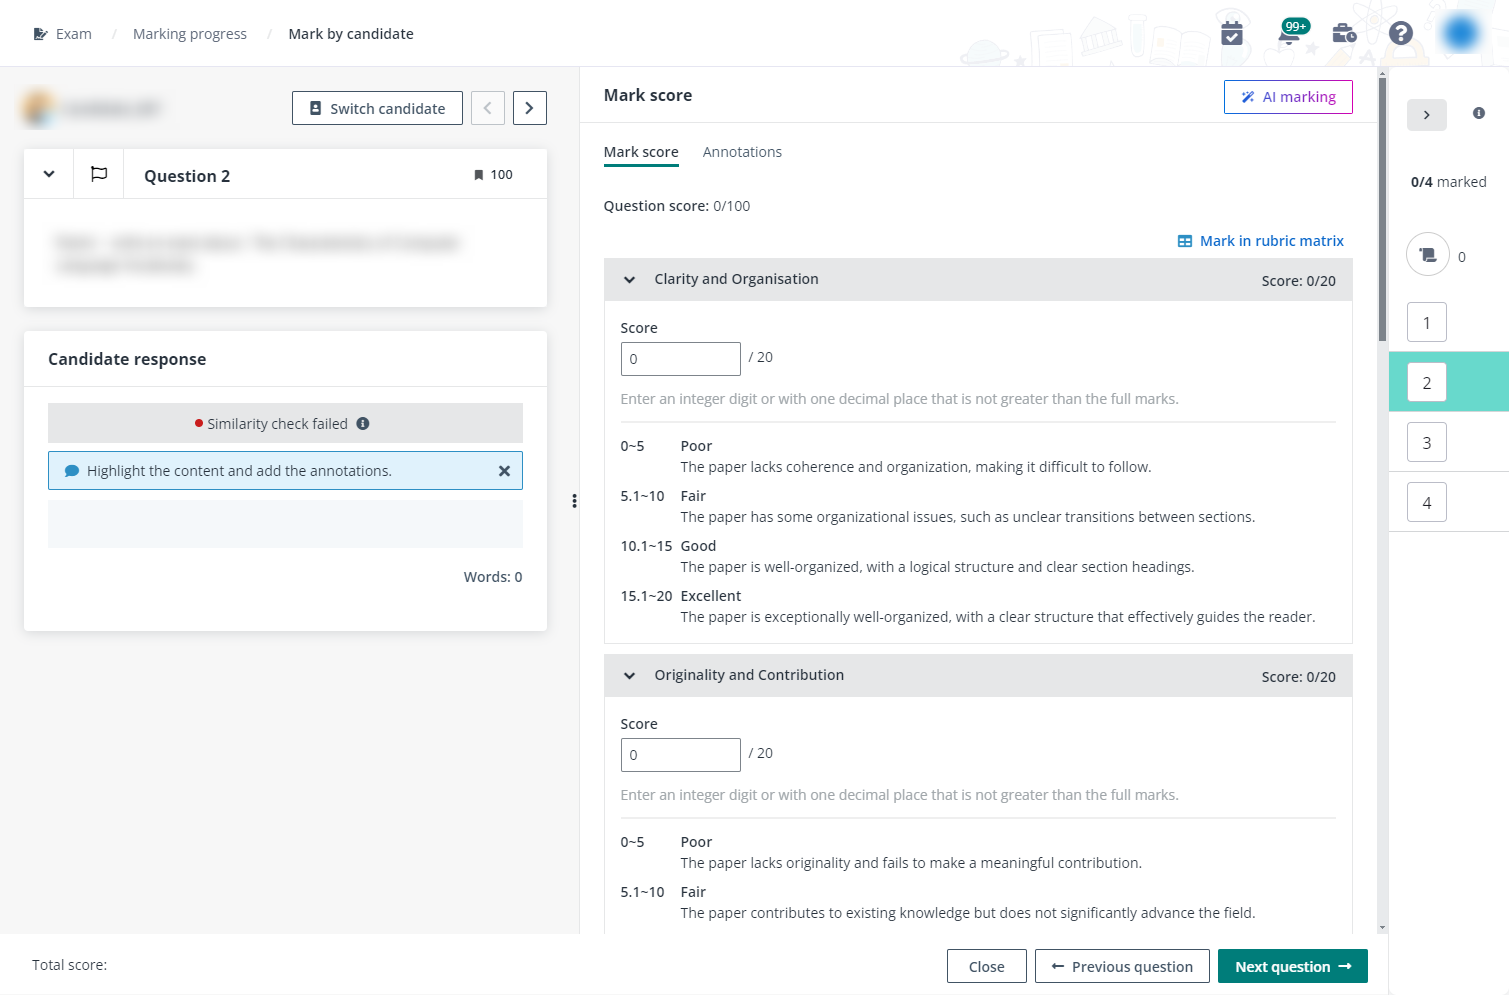
5. In the Mark
score section on the right, you can mark a score for each criterion after
checking the description of the specific expectations and qualities at each
performance level.
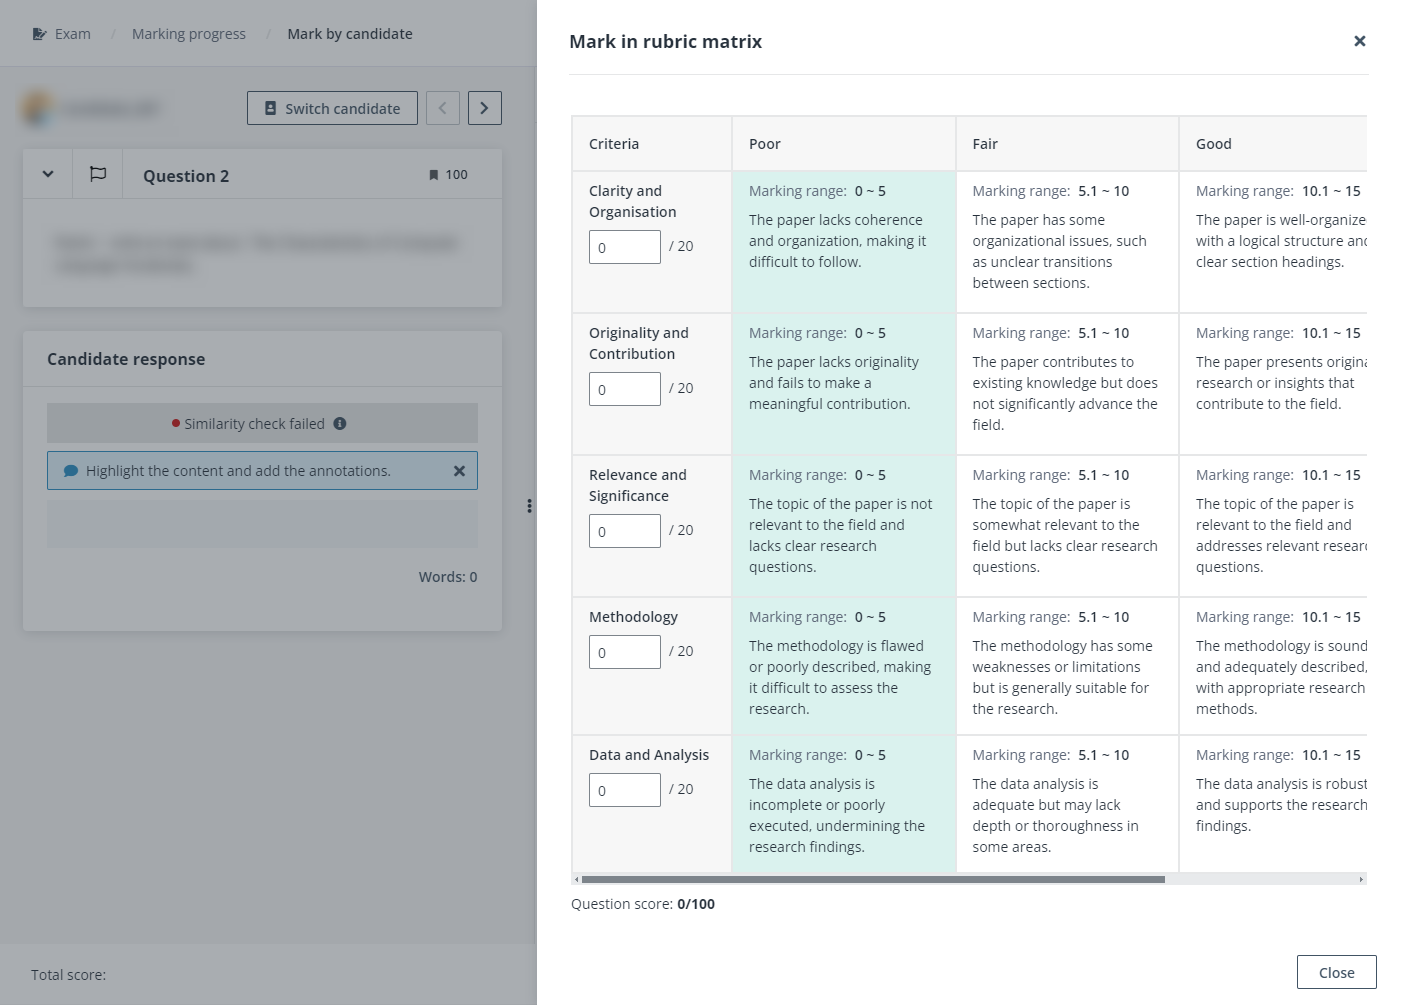
6. Alternatively,
you can click Mark in rubric matrix to access the rubric matrix window.
Enter a score for each criterion. The question score and the given score for
this question can be viewed at the bottom of the window.
